
Christmas Vegan Desserts transform holiday tables into magical spreads. No dairy. No eggs. Just pure plant-based bliss that’ll wow every guest at your festive gathering.
I’ll be honest with you. My first vegan Christmas? Total dessert disaster. I panicked when Aunt Carol asked about the traditional tiramisu. But here’s what I discovered: vegan holiday desserts can actually steal the show.
Think about it. Why should plant-based eaters miss out on festive magic?
These seven Christmas vegan desserts changed everything for me. We’re talking easy recipes that don’t require a culinary degree. Some are gluten-free. Others are raw… no oven needed! Perfect for when your kitchen’s already maxed out with roasted vegetables and stuffing.
I’ve tested each recipe multiple times. Some flopped initially. Others surprised me on the first try. The chocolate peppermint tart? Game-changer.
Whether you’re hosting die-hard vegans or curious omnivores, these desserts deliver. Rich flavors. Creamy textures. That wow-factor presentation. No one will guess they’re plant-based—unless you tell them.
Must-Try: 10 No Bake Vegan Desserts.
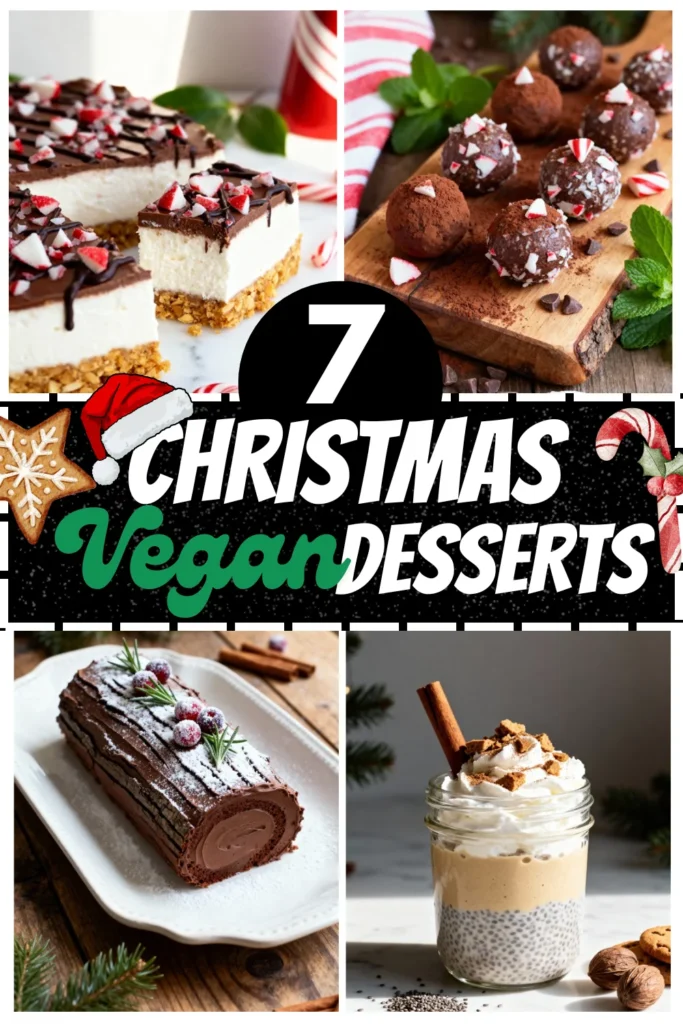
7 Christmas Vegan Desserts
Ready to make this your most delicious vegan Christmas yet? Let’s dive into these festive treats that prove compassionate eating never means compromising on celebration.
Here are 7 Christmas-themed vegan dessert ideas:
1. Raw Peppermint Chocolate Truffles
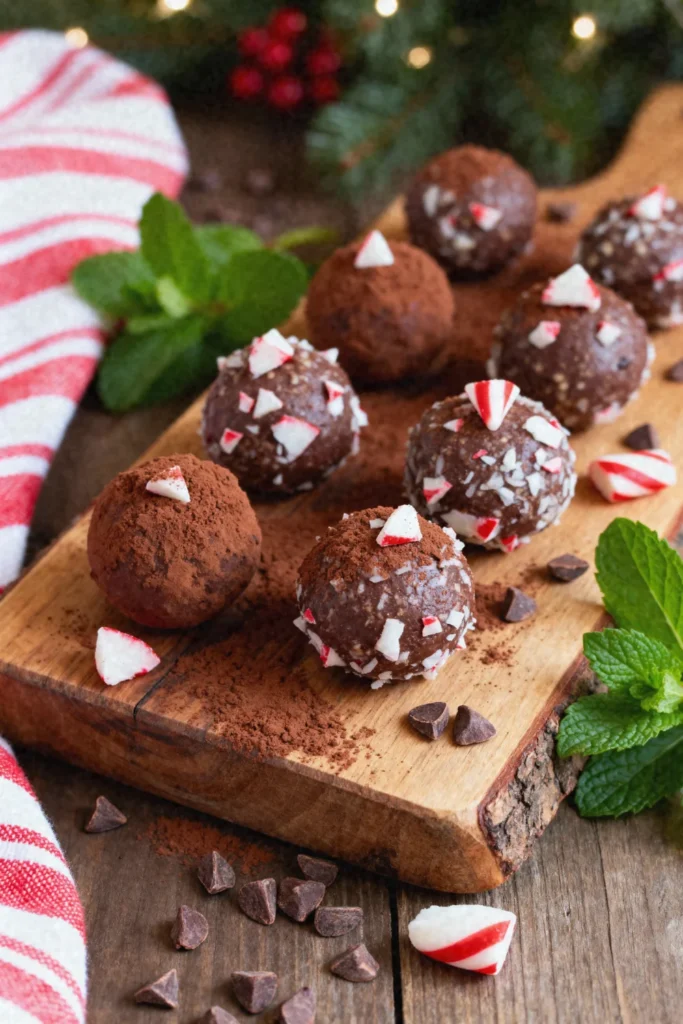
No-bake, energy-boosting bites made with dates, cacao, and fresh peppermint. Naturally sweetened. Ready in 15 minutes. Gluten-free and guilt-free indulgence.
Recipe Highlights (Quick Glance Section)
✅ Prep Time: 15 min
✅ Cook Time: 0 min (No-bake!)
✅ Total Time: 15 min (plus 30 min chilling)
✅ Servings: 16 truffles
✅ Estimated Cost: $8
✅ Calories per Serving: 85 calories
✅ Dietary Info: Vegan, Gluten-Free, Raw, Refined Sugar-Free, Dairy-Free
Category
✅ Courses: Dessert, Snacks
✅ Cuisines: American
Ingredients
For the Truffles:
- 1 cup Medjool dates, pitted (about 12-14 dates) – sub: regular dates, soaked 10 minutes
- ½ cup raw almonds – sub: cashews or walnuts
- ¼ cup raw cacao powder – sub: unsweetened cocoa powder
- 1 teaspoon pure peppermint extract – start with ½ teaspoon if unsure
- Pinch of sea salt
- 1-2 tablespoons water (if needed)
For Coating:
- ¼ cup raw cacao powder or crushed candy canes (vegan-certified)
Equipments
- Food processor, 2. Measuring cups and spoons, 3. Small bowl for coating, 4. Baking sheet or plate, 5. Parchment paper
Step-by-Step Instructions
Step 1: Add almonds to your food processor. Pulse until they’re finely ground. Like coarse flour. Don’t over-process or you’ll get almond butter.
Step 2: Toss in the pitted dates, cacao powder, peppermint extract, and sea salt. Process for 1-2 minutes. The mixture should stick together when pressed. Add water one tablespoon at a time if it’s too crumbly.
Step 3: Pinch off about one tablespoon of mixture. Roll it between your palms into a smooth ball. Repeat until you’ve used all the dough. You’ll get about 16 truffles.
Step 4: Roll each truffle in cacao powder or crushed candy canes. Get creative with the coating! Some in cacao, some in candy cane bits.
Step 5: Place truffles on a parchment-lined plate. Pop them in the fridge for 30 minutes to firm up. They’ll hold their shape better.
Step 6: Store in an airtight container in the fridge for up to two weeks. Or freeze for three months.
Final Notes
• These truffles are ridiculously forgiving—adjust peppermint to taste, swap nuts freely, and if your dates aren’t super soft, soak them first for easier blending and creamier texture.
2. Sugar-Free Gingerbread Nice Cream
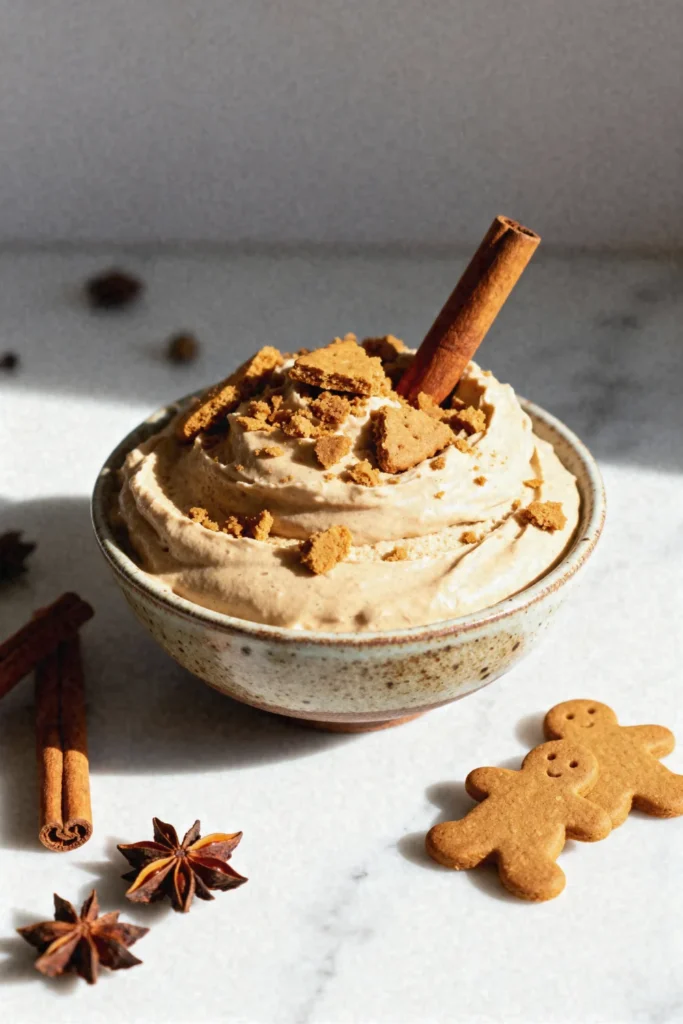
Frozen banana base blended with warming spices. No refined sugar. No ice cream maker needed. Creamy, healthy, and tastes like Christmas in a bowl.
Recipe Highlights (Quick Glance Section)
✅ Prep Time: 5 min
✅ Cook Time: 0 min (No cooking!)
✅ Total Time: 5 min
✅ Servings: 2-3 servings
✅ Estimated Cost: $4
✅ Calories per Serving: 120 calories
✅ Dietary Info: Vegan, Gluten-Free, Sugar-Free, Oil-Free, Raw
Category
✅ Courses: Dessert, Snacks
✅ Cuisines: American
Ingredients
For the Nice Cream:
- 4 ripe bananas, sliced and frozen (24 hours ahead) – must be frozen solid
- 1 teaspoon ground ginger – sub: fresh grated ginger, ½ teaspoon
- 1 teaspoon ground cinnamon
- ¼ teaspoon ground nutmeg
- ⅛ teaspoon ground cloves
- ¼ teaspoon vanilla extract
- 2-3 tablespoons non-dairy milk (almond, oat, or coconut) – add as needed for blending
- Optional: 1 tablespoon molasses for deeper flavor – adds traditional gingerbread taste
For Toppings:
- Crushed gingersnap cookies (vegan)
- Coconut whipped cream
- Candied ginger pieces
Equipments
- High-speed blender or food processor, 2. Measuring spoons, 3. Ice cream scoop, 4. Serving bowls, 5. Spatula
Step-by-Step Instructions
Step 1: Break your frozen banana slices into chunks. Toss them into your blender or food processor. They should be rock-solid frozen.
Step 2: Add all the spices—ginger, cinnamon, nutmeg, and cloves. Don’t skip the cloves! That’s your gingerbread secret weapon. Add vanilla extract too.
Step 3: Blend on high speed. Stop and scrape down the sides every 30 seconds. Add non-dairy milk one tablespoon at a time if it’s struggling. You want thick soft-serve texture.
Step 4: Keep blending until it’s smooth and creamy. Takes about 2-3 minutes total. It’ll go from chunky to magical.
Step 5: Taste and adjust spices. Want more ginger kick? Add a pinch more. This is your nice cream.
Step 6: Serve immediately for soft-serve consistency. Or freeze for 2 hours for scoopable ice cream texture. Top with crushed cookies or coconut cream.
Final Notes
• The riper and sweeter your bananas before freezing, the better your nice cream tastes—brown-spotted bananas are perfect, and freezing them peeled in zip-top bags makes this a quick anytime treat.
3. Easy Vegan Yule Log (Bûche de Noël)
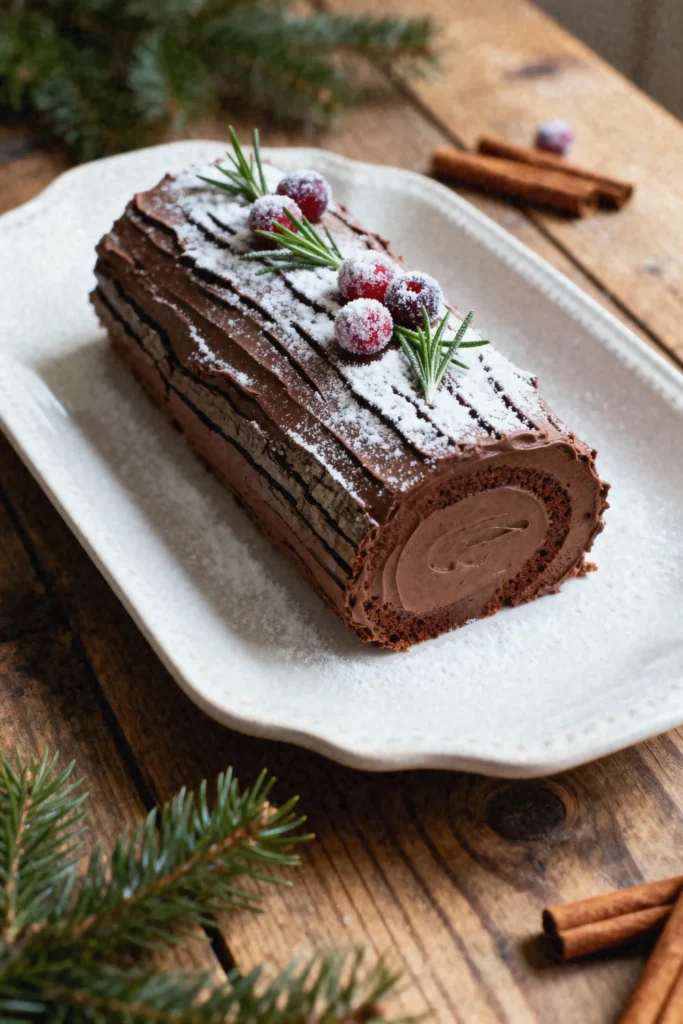
Classic Christmas rolled cake with coconut cream filling. Simpler than it looks. Naturally sweetened option. The centerpiece your table deserves.
Recipe Highlights (Quick Glance Section)
✅ Prep Time: 25 min
✅ Cook Time: 12 min
✅ Total Time: 37 min (plus cooling time)
✅ Servings: 8-10 slices
✅ Estimated Cost: $15
✅ Calories per Serving: 280 calories
✅ Dietary Info: Vegan, Dairy-Free, Egg-Free
Category
✅ Courses: Dessert
✅ Cuisines: French
Ingredients
For the Cake:
- 1 cup all-purpose flour – sub: gluten-free flour blend
- ⅓ cup cocoa powder
- 1 teaspoon baking powder
- ½ teaspoon baking soda
- ¼ teaspoon salt
- ¾ cup plant-based milk (almond or oat)
- ½ cup coconut sugar – sub: cane sugar
- ⅓ cup melted coconut oil
- 1 teaspoon vanilla extract
- 1 tablespoon apple cider vinegar
For the Filling:
- 1 can (13.5 oz) full-fat coconut cream, chilled overnight
- 3 tablespoons powdered sugar
- 1 teaspoon vanilla extract
For the Chocolate Frosting:
- ½ cup vegan butter, softened
- 2 cups powdered sugar
- ¼ cup cocoa powder
- 3 tablespoons plant-based milk
- 1 teaspoon vanilla extract
Equipments
- 10×15 inch jelly roll pan, 2. Parchment paper, 3. Mixing bowls (2), 4. Whisk, 5. Electric mixer, 6. Clean kitchen towel, 7. Offset spatula, 8. Fork (for bark texture)
Step-by-Step Instructions
Step 1: Preheat oven to 350°F. Line your jelly roll pan with parchment paper. Grease it lightly.
Step 2: Whisk together flour, cocoa powder, baking powder, baking soda, and salt in a bowl. Set aside.
Step 3: In another bowl, mix plant milk, coconut sugar, melted coconut oil, and vanilla. Add apple cider vinegar last. It’ll bubble slightly.
Step 4: Pour wet ingredients into dry. Stir until just combined. Don’t overmix! Spread evenly in your prepared pan.
Step 5: Bake for 10-12 minutes. The cake should spring back when touched. Don’t overbake or it’ll crack when rolling.
Step 6: Immediately flip cake onto a clean towel dusted with powdered sugar. Peel off parchment. Roll the cake up with the towel from the short end. Let it cool completely rolled up.
Step 7: Make filling by whipping chilled coconut cream with powdered sugar and vanilla until fluffy. About 3 minutes.
Step 8: Unroll cooled cake carefully. Spread filling evenly. Re-roll without the towel. Chill for 30 minutes.
Step 9: Beat vegan butter until creamy. Add powdered sugar, cocoa powder, milk, and vanilla. Mix until smooth and spreadable.
Step 10: Frost the entire log. Use a fork to create bark-like lines. Add powdered sugar “snow” and fresh rosemary sprigs.
Final Notes
• The rolling-while-warm trick prevents cracking—trust the process, and if small cracks appear, frosting covers everything beautifully, so don’t stress about perfection on your first attempt.
4. No-Bake Candy Cane Cheesecake Bars
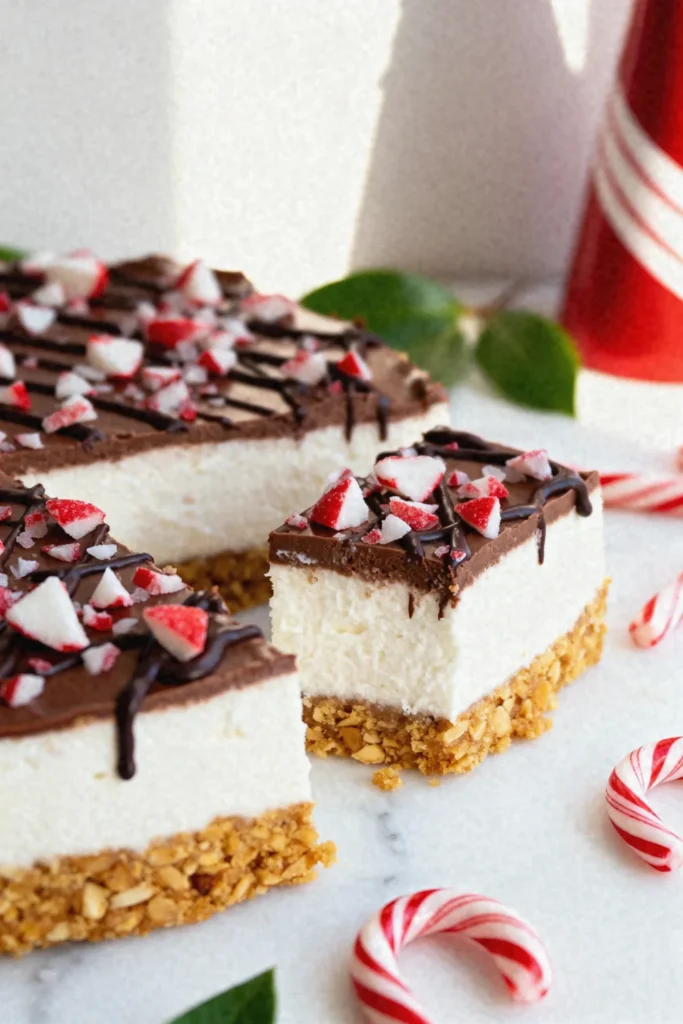
Cashew-based creamy filling with crushed candy canes. Gluten-free crust. Make ahead and freeze. Festive red and white swirls.
Recipe Highlights (Quick Glance Section)
✅ Prep Time: 20 min
✅ Cook Time: 0 min (No-bake!)
✅ Total Time: 20 min (plus 4 hours freezing)
✅ Servings: 12 bars
✅ Estimated Cost: $18
✅ Calories per Serving: 245 calories
✅ Dietary Info: Vegan, Dairy-Free, Gluten-Free (with GF crust), Refined Sugar-Free Option
Category
✅ Courses: Dessert
✅ Cuisines: American
Ingredients
For the Crust:
- 1½ cups raw cashews – sub: macadamia nuts for creamier texture
- 1 cup pitted Medjool dates (about 10-12 dates)
- ¼ cup shredded coconut
- Pinch of sea salt
For the Cheesecake Filling:
- 2 cups raw cashews, soaked 4 hours (or boiled 10 minutes)
- ½ cup full-fat coconut cream
- ⅓ cup maple syrup – sub: agave nectar
- ¼ cup melted coconut oil
- 2 tablespoons lemon juice
- 1 teaspoon vanilla extract
- ½ teaspoon peppermint extract
- Pinch of sea salt
For Topping:
- ½ cup crushed vegan candy canes
- 2 tablespoons melted dark chocolate (vegan)
Equipments
- 8×8 inch square pan, 2. Parchment paper, 3. Food processor, 4. High-speed blender, 5. Measuring cups and spoons, 6. Spatula, 7. Small bowl for melting chocolate
Step-by-Step Instructions
Step 1: Line your square pan with parchment paper. Leave overhang on the sides for easy removal later.
Step 2: Make the crust by processing cashews, dates, shredded coconut, and salt in your food processor. Pulse until it sticks together when pressed. About 1-2 minutes.
Step 3: Press crust mixture firmly into the bottom of your prepared pan. Use the back of a spoon or your hands. Make it even and compact.
Step 4: Drain your soaked cashews completely. Add them to a high-speed blender with coconut cream, maple syrup, melted coconut oil, lemon juice, vanilla, peppermint extract, and salt.
Step 5: Blend on high for 2-3 minutes. Stop and scrape down sides as needed. The filling should be completely smooth and creamy. No graininess allowed!
Step 6: Taste the filling. Want more peppermint punch? Add another ¼ teaspoon. Pour the filling over your crust layer.
Step 7: Tap the pan gently on the counter to remove air bubbles. Smooth the top with a spatula.
Step 8: Sprinkle crushed candy canes over the top. Drizzle with melted dark chocolate in a zigzag pattern. Get creative!
Step 9: Freeze for at least 4 hours or overnight. These need to be completely firm before cutting.
Step 10: Remove from freezer 10 minutes before serving. Use the parchment overhang to lift out. Cut into 12 bars with a sharp knife.
Final Notes
• Store these bars in the freezer and let them soften slightly before serving—they taste best slightly chilled, not rock-hard, and the peppermint flavor intensifies beautifully after 24 hours.
5. Quick Christmas Spiced Poached Pears
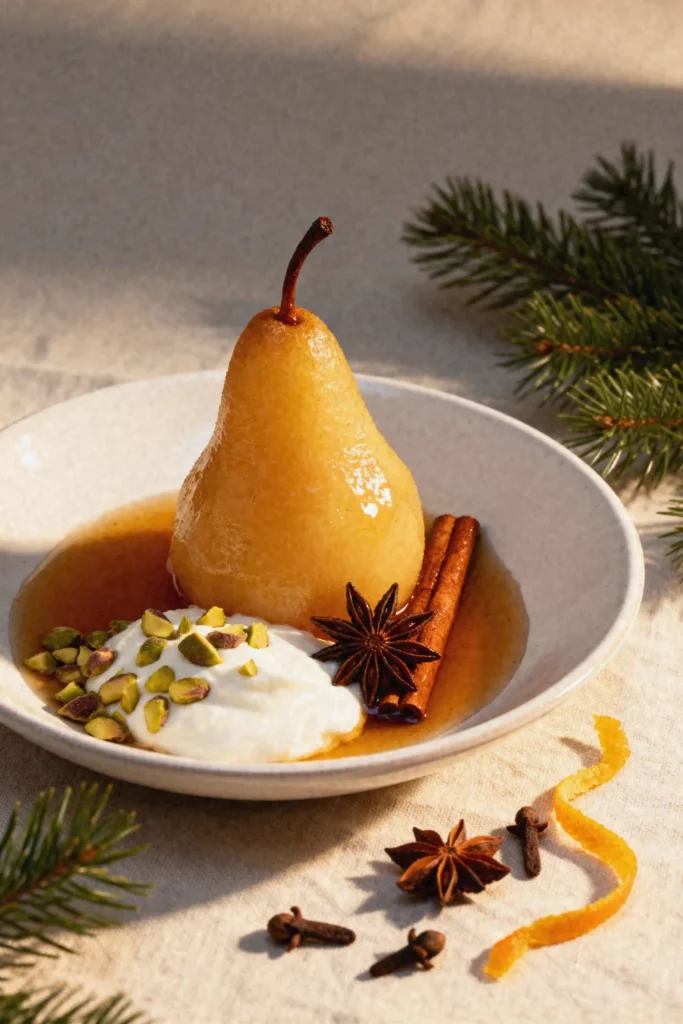
Pears simmered in cinnamon, star anise, and orange. Naturally sweet. Elegant presentation. Gluten-free. Ready in 20 minutes.
Recipe Highlights (Quick Glance Section)
✅ Prep Time: 5 min
✅ Cook Time: 20 min
✅ Total Time: 25 min
✅ Servings: 4 pears
✅ Estimated Cost: $10
✅ Calories per Serving: 165 calories
✅ Dietary Info: Vegan, Gluten-Free, Oil-Free, Refined Sugar-Free
Category
✅ Courses: Dessert
✅ Cuisines: French
Ingredients
For the Poaching Liquid:
- 4 firm but ripe pears (Bosc or Anjou work best)
- 3 cups water
- 1 cup orange juice (freshly squeezed is amazing)
- ¼ cup maple syrup – sub: agave nectar or coconut sugar
- 2 cinnamon sticks
- 3 whole star anise
- 4 whole cloves
- 1 teaspoon vanilla extract
- Zest of 1 orange, peeled in strips
- Optional: ¼ cup red wine for deeper color and flavor
For Serving:
- Coconut yogurt or vegan vanilla ice cream
- Chopped pistachios or almonds
- Fresh mint leaves
Equipments
- Large saucepan or deep pot, 2. Vegetable peeler, 3. Sharp knife, 4. Slotted spoon, 5. Measuring cups and spoons, 6. Serving plates
Step-by-Step Instructions
Step 1: Peel your pears carefully but keep the stems intact. They look so elegant that way! Slice a tiny bit off the bottom so they stand upright.
Step 2: Pour water, orange juice, and maple syrup into your saucepan. Add cinnamon sticks, star anise, cloves, vanilla, and orange zest strips. Stir it up.
Step 3: Bring the poaching liquid to a gentle simmer over medium heat. Don’t let it boil aggressively. We want gentle bubbles.
Step 4: Carefully place your peeled pears into the simmering liquid. They should be mostly submerged. If not, add a bit more water.
Step 5: Reduce heat to low. Cover the pot partially. Let pears poach for 15-20 minutes, turning them occasionally. They’re done when a knife slides in easily.
Step 6: The cooking time depends on pear ripeness. Firmer pears need longer. Keep checking with a knife after 15 minutes.
Step 7: Remove pears with a slotted spoon. Set them aside on serving plates to cool slightly.
Step 8: Optional but worth it: Increase heat to high. Boil the poaching liquid for 8-10 minutes until it reduces to a syrupy consistency. This is your sauce!
Step 9: Drizzle the reduced syrup over your pears. The spices and orange create incredible flavor.
Step 10: Serve warm or chilled with coconut yogurt, chopped nuts, and fresh mint. Keep some star anise for garnish. So pretty!
Final Notes
• These pears taste even better the next day after soaking in their spiced syrup overnight—make them ahead for stress-free entertaining and serve at room temperature for maximum flavor impact.
6. Raw Cranberry Orange Energy Balls

Tart cranberries meet zesty orange. No-bake. Naturally sweetened with dates. Perfect for holiday snacking. Gluten-free and guilt-free.
Recipe Highlights (Quick Glance Section)
✅ Prep Time: 10 min
✅ Cook Time: 0 min (No-bake!)
✅ Total Time: 10 min (plus 20 min chilling)
✅ Servings: 18-20 energy balls
✅ Estimated Cost: $9
✅ Calories per Serving: 75 calories
✅ Dietary Info: Vegan, Gluten-Free, Raw, Refined Sugar-Free, Oil-Free
Category
✅ Courses: Snacks, Dessert
✅ Cuisines: American
Ingredients
For the Energy Balls:
- 1 cup pitted Medjool dates (about 10-12 dates) – sub: dried figs for different flavor
- ½ cup raw cashews – sub: almonds or sunflower seeds
- ½ cup dried cranberries (unsweetened preferred)
- Zest of 1 large orange
- 2 tablespoons fresh orange juice
- ½ cup rolled oats (certified gluten-free if needed)
- 2 tablespoons chia seeds
- 1 teaspoon vanilla extract
- ¼ teaspoon cinnamon
- Pinch of sea salt
For Rolling (Optional):
- Shredded coconut
- Extra orange zest
- Finely chopped dried cranberries
Equipments
- Food processor, 2. Microplane or zester, 3. Measuring cups and spoons, 4. Small bowl for coating, 5. Baking sheet or plate, 6. Parchment paper
Step-by-Step Instructions
Step 1: If your dates aren’t super soft, soak them in warm water for 5 minutes. Drain completely before using. This makes blending easier.
Step 2: Add cashews to your food processor. Pulse until they’re roughly chopped. You want some texture, not cashew butter.
Step 3: Toss in dates, dried cranberries, orange zest, orange juice, oats, chia seeds, vanilla, cinnamon, and salt. Don’t skip the orange zest! That’s where the magic lives.
Step 4: Process for 1-2 minutes, stopping to scrape down sides. The mixture should stick together when you pinch it. Not too dry, not too wet.
Step 5: Test the consistency by squeezing a small amount. If it holds together, you’re golden. Too crumbly? Add a splash more orange juice.
Step 6: Scoop out about one tablespoon of mixture. Roll it between your palms into a smooth ball. Repeat with remaining mixture.
Step 7: Optional but festive: Roll some balls in shredded coconut. Others in extra orange zest. Get creative with your coating!
Step 8: Place finished energy balls on a parchment-lined plate. Pop them in the fridge for 20 minutes to firm up.
Step 9: Once chilled, transfer to an airtight container. Layer them with parchment paper if stacking.
Step 10: Store in the fridge for up to two weeks. Or freeze for three months. Perfect grab-and-go holiday snack!
Final Notes
• These energy balls are incredibly versatile—swap cranberries for cherries, add a tablespoon of cacao nibs for chocolate orange version, or double the batch because they disappear frighteningly fast at holiday gatherings.
7. 10-Minute Vegan Eggnog Chia Pudding
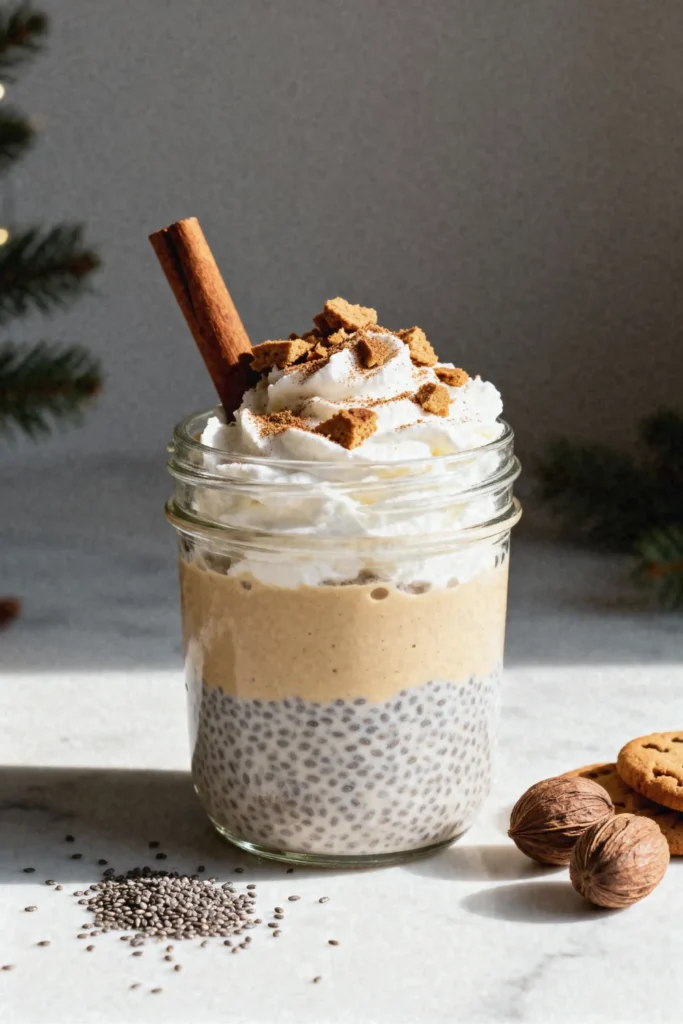
Creamy, spiced, and festive. Made with coconut milk and nutmeg. Prep the night before. Naturally gluten-free. Christmas morning perfection.
Recipe Highlights (Quick Glance Section)
✅ Prep Time: 10 min
✅ Cook Time: 0 min (No cooking!)
✅ Total Time: 10 min (plus 4 hours or overnight chilling)
✅ Servings: 4 servings
✅ Estimated Cost: $8
✅ Calories per Serving: 195 calories
✅ Dietary Info: Vegan, Gluten-Free, Refined Sugar-Free, High-Fiber
Category
✅ Courses: Breakfast, Dessert
✅ Cuisines: American
Ingredients
For the Chia Pudding:
- 1½ cups full-fat coconut milk (from a can) – sub: cashew or oat milk for lighter version
- ½ cup unsweetened almond milk
- ⅓ cup chia seeds
- 3 tablespoons maple syrup – sub: agave or date syrup
- 1 teaspoon vanilla extract
- ½ teaspoon ground nutmeg
- ½ teaspoon ground cinnamon
- ¼ teaspoon ground ginger
- Pinch of ground cloves
- Pinch of sea salt
- Optional: 1 tablespoon rum extract for authentic eggnog flavor
For Topping:
- Coconut whipped cream
- Extra nutmeg for dusting
- Crushed gingersnap cookies (vegan)
- Cinnamon stick for garnish
Equipments
- Medium mixing bowl, 2. Whisk, 3. Measuring cups and spoons, 4. Four serving jars or glasses, 5. Spoon for stirring
Step-by-Step Instructions
Step 1: In your mixing bowl, combine coconut milk and almond milk. Whisk them together until smooth and well blended.
Step 2: Add maple syrup, vanilla extract, nutmeg, cinnamon, ginger, cloves, and salt. Whisk vigorously. The spices need to distribute evenly throughout.
Step 3: Pour in the chia seeds. Whisk immediately for about 30 seconds. This prevents clumping. Nobody wants chia clumps!
Step 4: Let the mixture sit for 5 minutes. Then whisk again thoroughly. This second whisk is crucial for even texture.
Step 5: Divide the mixture evenly between your four serving jars or glasses. Cover each with a lid or plastic wrap.
Step 6: Refrigerate for at least 4 hours or overnight. The chia seeds need time to absorb liquid and create that creamy pudding texture.
Step 7: After chilling, give each jar a good stir. The pudding should be thick and creamy. Too thick? Add a splash of milk.
Step 8: Taste and adjust sweetness if needed. Sometimes I add an extra drizzle of maple syrup in the morning.
Step 9: Top with a generous dollop of coconut whipped cream. Dust with fresh nutmeg. It smells like Christmas morning!
Step 10: Add crushed gingersnap cookies for crunch. Stick a cinnamon stick in for that wow presentation. Serve chilled and enjoy!
Final Notes
• Make this the night before Christmas morning for an effortless festive breakfast—the flavors deepen overnight, and you can prep multiple jars at once for easy grab-and-go holiday meals throughout the week.
Must-Try: 7 Gluten Free Vegan Dessert Recipes.

Hi, I’m Aldvin Gomes, a passionate vegan and foodie on a mission to make plant-based eating effortless and exciting. I share new vegan recipes every day, so you never have to stress about what to cook. Whether you’re a longtime vegan or just exploring plant-based meals, my goal is to keep your plate full of delicious, wholesome, and easy-to-make dishes. I’m here to help you enjoy every bite. Join me in exploring the endless possibilities of vegan cooking, one delicious recipe at a time!