No bake vegan desserts are my secret weapon when sweet cravings hit hard but I’m too lazy to preheat the oven… or when summer makes baking feel like actual torture.
I’ll be honest with you. There was this one sweltering july afternoon when I promised to bring dessert to a potluck. The thought of turning on my oven? Absolutely not happening. That’s when I discovered the magic of no-bake vegan treats, and honestly, my life changed forever.
These desserts are ridiculously easy to throw together. We’re talking quick, simple recipes that don’t require fancy equipment or culinary school training.
Just a mixing bowl, a fridge, and maybe fifteen minutes of your time. The best part? They taste so decadent that nobody believes they’re actually guilt-free and healthy.
I used to think vegan desserts meant sacrificing flavor or spending hours in the kitchen. Wrong on both counts. These ten recipes prove you can have creamy, rich, absolutely delicious treats without eggs, dairy, or any baking whatsoever.
Must-Try: No Sugar Vegan Dessert Recipes.
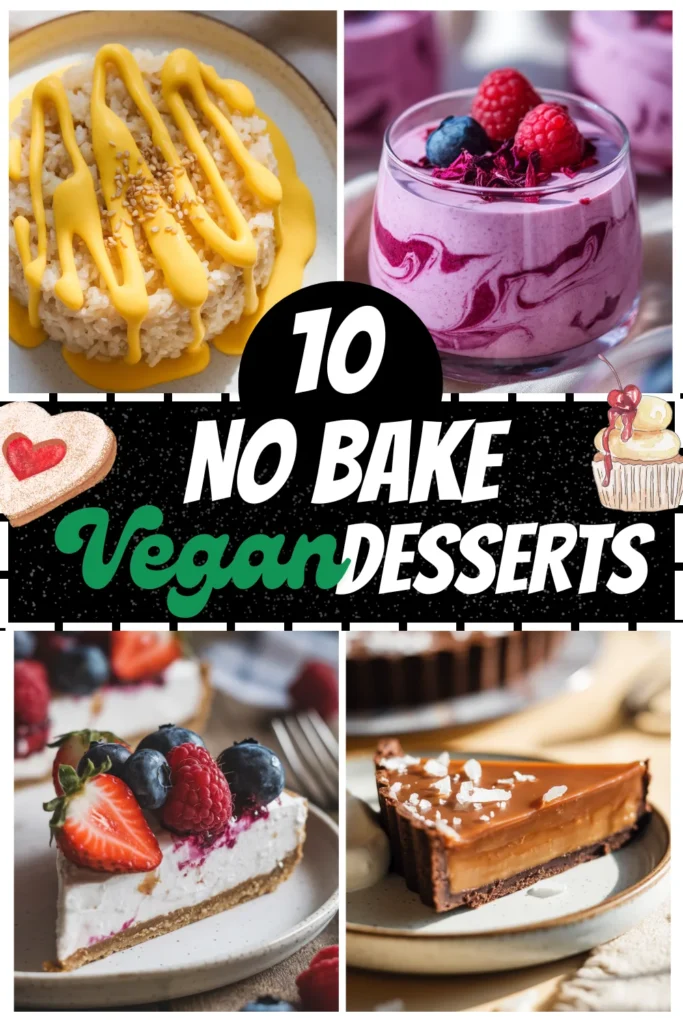
10 No Bake Vegan Desserts
Whether you’re already vegan or just curious about plant-based sweets, these desserts will surprise you.
No judgment if you eat three in one sitting. I certainly have. Ready to discover which one becomes your new obsession?
1. Matcha White Chocolate Truffles
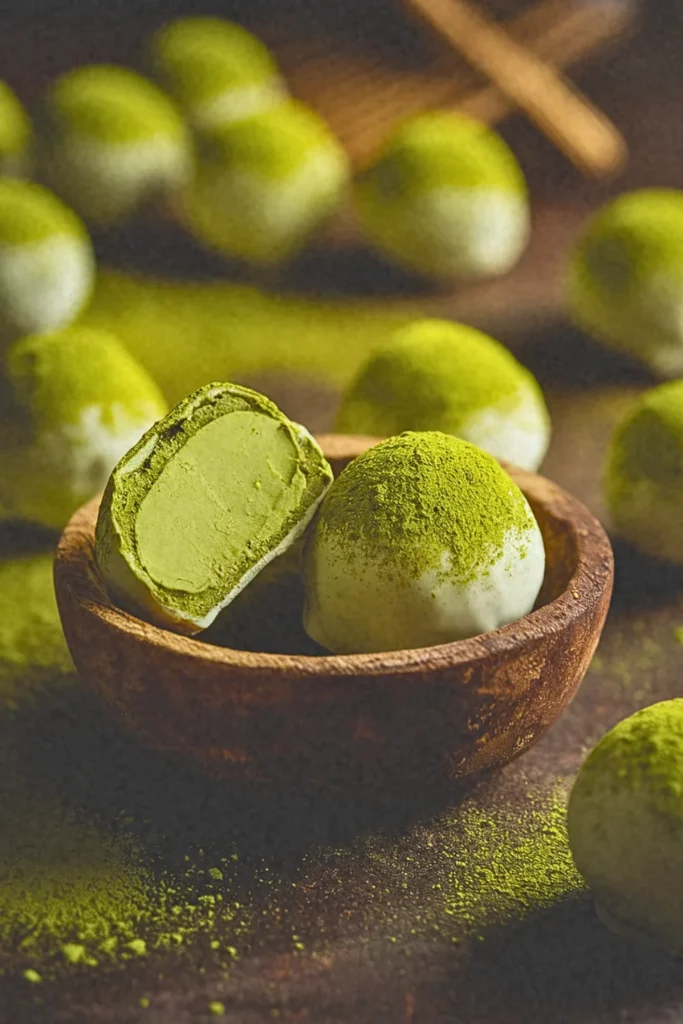
I’m talking about that beautiful green tea flavor paired with creamy coconut butter that mimics white chocolate perfectly. These little spheres look elegant and taste sophisticated without being overly sweet.
Recipe Highlights
✅ Prep Time: 15 min
✅ Chill Time: 2 hours
✅ Total Time: 2 hours 15 min
✅ Servings: 16 truffles
✅ Estimated Cost: $14
✅ Calories per Serving: 95 calories
✅ Dietary Info: Vegan, Gluten-Free, Refined Sugar-Free, Raw
Category
✅ Courses: Dessert, Snacks
✅ Cuisines: Japanese-Inspired, Fusion
Ingredients
For the Truffles:
- 1 cup raw cashews, soaked for 4 hours and drained
- ½ cup coconut butter, melted (can substitute with more coconut cream for softer texture)
- ¼ cup maple syrup (or agave nectar for milder sweetness)
- 2 tablespoons coconut cream, the thick part from canned coconut milk
- 1 tablespoon ceremonial grade matcha powder (culinary grade works but tastes slightly bitter)
- 1 teaspoon vanilla extract
- Pinch of sea salt
For Coating:
- 2 tablespoons matcha powder for rolling
- 2 tablespoons desiccated coconut, optional for variety
Equipment
- High-speed blender or food processor, 2. Measuring cups and spoons, 3. Small mixing bowl, 4. Baking sheet or plate, 5. Parchment paper, 6. Small cookie scoop or melon baller
Step-by-Step Instructions
Step 1: Drain your soaked cashews completely and pat them dry with a kitchen towel. This removes excess moisture that could make your truffles too soft to hold their shape.
Step 2: Add the cashews, melted coconut butter, maple syrup, coconut cream, matcha powder, vanilla extract, and sea salt into your blender. Blend on high speed for two to three minutes until completely smooth and creamy. Stop and scrape down the sides halfway through to ensure everything incorporates evenly.
Step 3: Taste the mixture and adjust sweetness if needed. The matcha should be present but not overpowering. Transfer the mixture to a bowl and refrigerate for thirty minutes until it firms up enough to scoop.
Step 4: Line your baking sheet with parchment paper. Use a small cookie scoop to portion out the mixture into roughly tablespoon-sized balls. Roll each portion between your palms to create smooth spheres.
Step 5: Place the matcha powder in a small bowl. Gently roll each truffle in the matcha powder until evenly coated. Alternatively, roll half in coconut for variety.
Step 6: Place coated truffles back on the parchment-lined sheet and refrigerate for at least ninety minutes until completely firm. They’ll develop a better texture after chilling.
Final Notes
• These truffles keep beautifully in an airtight container in the fridge for up to two weeks or frozen for three months, making them perfect for meal prep or unexpected guests who need impressing with minimal effort.
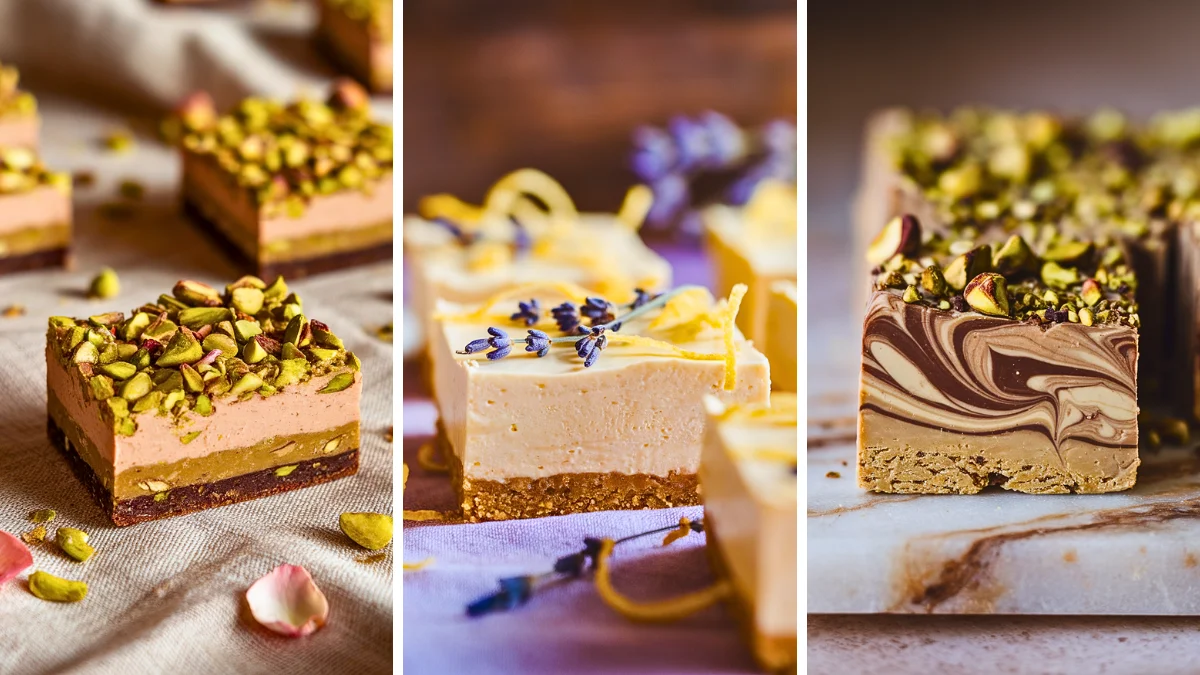
2. Cardamom Rose Pistachio Bars

Middle Eastern flavors don’t get enough love in Western desserts. The floral notes from rose water combined with warming cardamom and crunchy pistachios create something magical that feels special occasion worthy.
Recipe Highlights
✅ Prep Time: 20 min
✅ Chill Time: 3 hours
✅ Total Time: 3 hours 20 min
✅ Servings: 12 bars
✅ Estimated Cost: $16
✅ Calories per Serving: 180 calories
✅ Dietary Info: Vegan, Gluten-Free, Refined Sugar-Free, Raw
Category
✅ Courses: Dessert, Snacks
✅ Cuisines: Middle Eastern-Inspired, Persian Fusion
Ingredients
For the Base Layer:
- 1½ cups Medjool dates, pitted and packed (substitute with dried figs if dates are unavailable)
- 1 cup raw pistachios, shelled
- ½ cup shredded unsweetened coconut
- ½ teaspoon ground cardamom
- Pinch of sea salt
For the Rose Pistachio Cream Layer:
- 1 cup raw cashews, soaked for 4 hours and drained
- ⅓ cup coconut cream, the thick part only
- ¼ cup maple syrup (or date syrup for authentic Middle Eastern flavor)
- 2 tablespoons coconut oil, melted
- 1½ teaspoons rose water (use carefully as it’s potent; substitute with vanilla if rose isn’t your thing)
- ½ teaspoon ground cardamom
- ¼ cup chopped pistachios for topping
- Pinch of sea salt
Equipment
- Food processor, 2. High-speed blender, 3. 8×8 inch square pan, 4. Parchment paper, 5. Measuring cups and spoons, 6. Spatula
Step-by-Step Instructions
Step 1: Line your square pan with parchment paper, leaving some overhang on the sides. This makes lifting the bars out later incredibly easy and prevents any sticking disasters.
Step 2: Add the dates, pistachios, shredded coconut, cardamom, and salt to your food processor. Pulse until the mixture becomes crumbly but holds together when you squeeze it between your fingers. You want some texture here, not a smooth paste.
Step 3: Press this mixture firmly and evenly into the bottom of your prepared pan. Use the back of a measuring cup to really pack it down. This creates a solid foundation that won’t crumble when you cut the bars later.
Step 4: Drain your soaked cashews thoroughly. Add them to your blender along with coconut cream, maple syrup, melted coconut oil, rose water, cardamom, and salt. Blend on high for two to three minutes until completely silky smooth. Stop and taste it. The rose should be noticeable but not soapy or overwhelming.
Step 5: Pour this cream mixture over your pressed base layer and smooth the top with a spatula. Sprinkle the chopped pistachios evenly across the surface, pressing them gently so they stick.
Step 6: Freeze the pan for at least three hours until completely firm. Once set, lift out using the parchment overhang and slice into twelve bars using a sharp knife. Wipe the knife between cuts for clean edges.
Final Notes
• Store these bars in the freezer and let them sit at room temperature for five minutes before eating to achieve the perfect creamy texture that melts slightly on your tongue while maintaining structure.
3. Berry Coconut Cream Tart
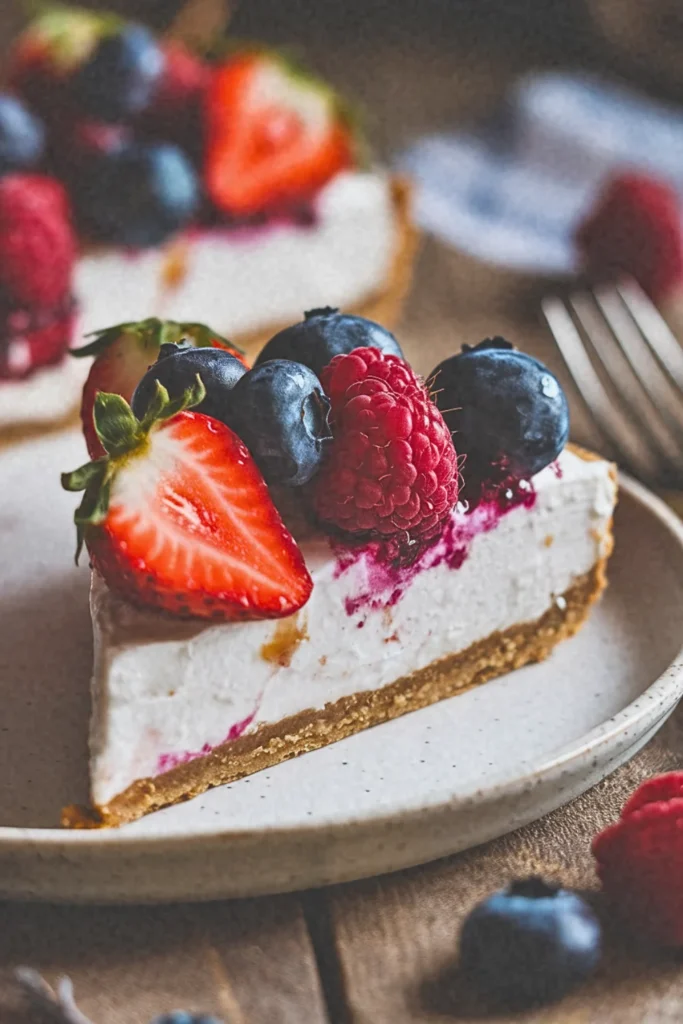
Fresh berries on top of coconut whipped cream in a date-nut crust. It’s refreshing, naturally sweet, and looks absolutely stunning on any table. This one always disappears first at gatherings.
Recipe Highlights
✅ Prep Time: 20 min
✅ Cook Time: 25 min
✅ Total Time: 45 min (plus 4 hours chilling)
✅ Servings: 8
✅ Estimated Cost: $18
✅ Calories per Serving: 285
✅ Dietary Info: Vegan, Dairy-Free, Refined Sugar-Free
Category
✅ Courses: Dessert
✅ Cuisines: American, French-inspired
Ingredients
For the Crust:
- 1½ cups raw almonds (or substitute with walnuts for a deeper flavor)
- 1 cup pitted Medjool dates (about 12 dates, softened in warm water if dry)
- 2 tablespoons melted coconut oil
- ¼ teaspoon sea salt
For the Coconut Cream:
- 2 cans (13.5 oz each) full-fat coconut milk, refrigerated overnight
- 3 tablespoons maple syrup (or substitute agave nectar)
- 1 teaspoon vanilla extract
- 2 tablespoons coconut flour (or cornstarch for thickening)
For the Berry Topping:
- 2 cups mixed fresh berries (strawberries, blueberries, raspberries, blackberries)
- 2 tablespoons maple syrup
- 1 tablespoon lemon juice
Equipments
- Food processor, 2. 9-inch tart pan with removable bottom, 3. Mixing bowls (medium and large), 4. Electric mixer or whisk, 5. Spatula, 6. Measuring cups and spoons, 7. Refrigerator
Step-by-Step Instructions
Step 1: Process almonds in your food processor until they form fine crumbs. Add dates, melted coconut oil, and salt, then pulse until the mixture sticks together when pressed between your fingers.
Step 2: Press the crust mixture firmly and evenly into the bottom and up the sides of your tart pan. Refrigerate while preparing the filling.
Step 3: Scoop only the thick coconut cream from your chilled cans into a mixing bowl, leaving the liquid behind. Beat with an electric mixer for two minutes until fluffy.
Step 4: Add maple syrup, vanilla extract, and coconut flour to the whipped cream. Continue beating for another minute until smooth and well combined.
Step 5: Spread the coconut cream evenly over the chilled crust using a spatula. Refrigerate for at least four hours or overnight until completely set.
Step 6: Before serving, arrange fresh berries beautifully on top. Drizzle with maple syrup mixed with lemon juice for a glossy finish.
Final Notes
• This luxurious tart showcases how plant-based desserts can deliver incredible creaminess without dairy, while the date-sweetened crust provides natural energy and the berries add antioxidant-rich brightness to every bite.
4. Dulce de Leche Date Caramel Tart
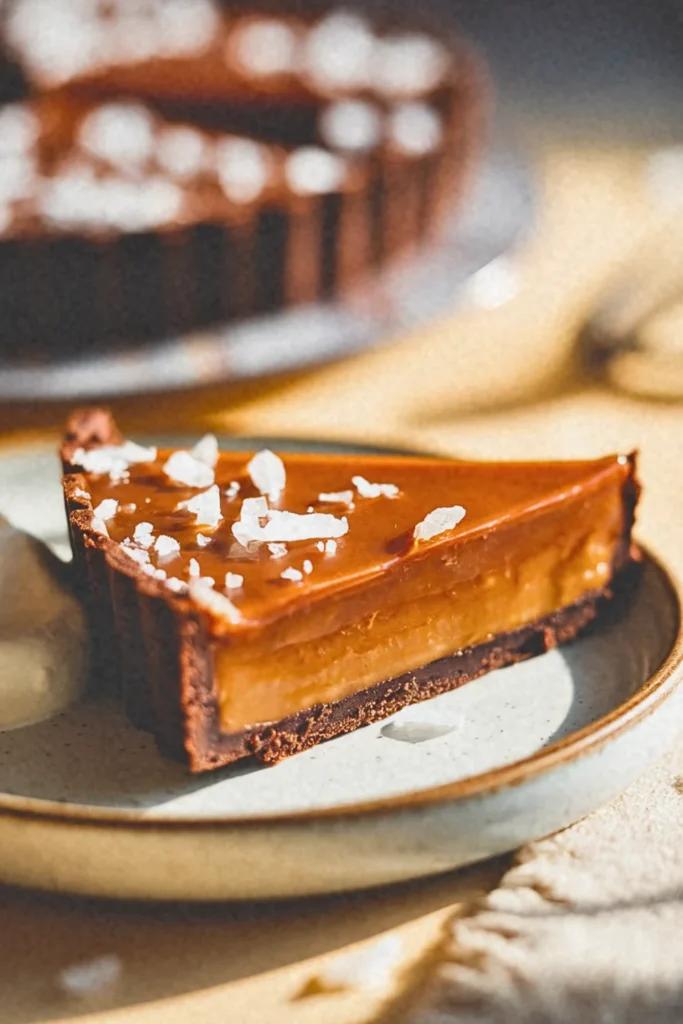
Dates blended with a touch of salt transform into something that tastes exactly like caramel. Layer this over a pecan crust and you’ve got depth of flavor that rivals any baked dessert.
Recipe Highlights
✅ Prep Time: 25 min
✅ Cook Time: 0 min (No-Bake)
✅ Total Time: 25 min (plus 3 hours chilling)
✅ Servings: 10 slices
✅ Estimated Cost: $16
✅ Calories per Serving: 320
✅ Dietary Info: Vegan, Dairy-Free, No-Bake, Gluten-Free Option
Category
✅ Courses: Dessert, Special Occasion Treat
✅ Cuisines: Latin American-Inspired, Fusion
Ingredients
Crust Base:
- 2 cups pitted Medjool dates (substitute: dried figs for variation)
- 1½ cups raw walnuts (substitute: pecans or almonds)
- ¼ cup shredded coconut
- 2 tablespoons cacao powder
- ¼ teaspoon sea salt
Date Caramel Filling:
- 1½ cups pitted Medjool dates, soaked in hot water 15 minutes
- ½ cup full-fat coconut milk
- ¼ cup almond butter (substitute: cashew butter for creamier texture)
- 3 tablespoons maple syrup
- 2 teaspoons vanilla extract
- ½ teaspoon sea salt
- 2 tablespoons coconut oil, melted
Topping:
- Flaky sea salt for garnish
- Coconut whipped cream (optional)
Equipments
- 9-inch tart pan with removable bottom, 2. Food processor, 3. High-speed blender, 4. Mixing bowls, 5. Measuring cups and spoons, 6. Spatula, 7. Small bowl for soaking dates
Step-by-Step Instructions
Step 1: Add walnuts, dates, shredded coconut, cacao powder, and salt to your food processor, then pulse until the mixture becomes crumbly but holds together when pressed between your fingers.
Step 2: Transfer the crust mixture to your tart pan and press it firmly into the bottom and up the sides, creating an even layer that will hold the caramel filling securely.
Step 3: Drain the soaked dates thoroughly and add them to your blender along with coconut milk, almond butter, maple syrup, vanilla extract, salt, and melted coconut oil.
Step 4: Blend on high speed for two to three minutes, stopping occasionally to scrape down the sides, until you achieve a silky smooth caramel consistency without any date chunks remaining.
Step 5: Pour the date caramel filling into the prepared crust, using your spatula to spread it evenly and create a smooth, glossy surface that reaches all edges.
Step 6: Refrigerate the tart for at least three hours or until the filling sets to a firm yet creamy texture that slices beautifully without being too soft.
Step 7: Before serving, remove the tart from the pan by gently pushing up the removable bottom, then sprinkle with flaky sea salt to enhance the caramel flavor with a sweet-salty contrast.
Step 8: Slice with a warm knife for clean cuts, wiping the blade between slices, and serve chilled with optional coconut whipped cream for an extra indulgent presentation.
Final Notes
• This tart tastes remarkably like traditional dulce de leche but relies entirely on dates for natural sweetness and caramel flavor, making it refined sugar-free while delivering rich, complex sweetness that deepens after chilling overnight in the refrigerator.
5. Turmeric Golden Milk Panna Cotta
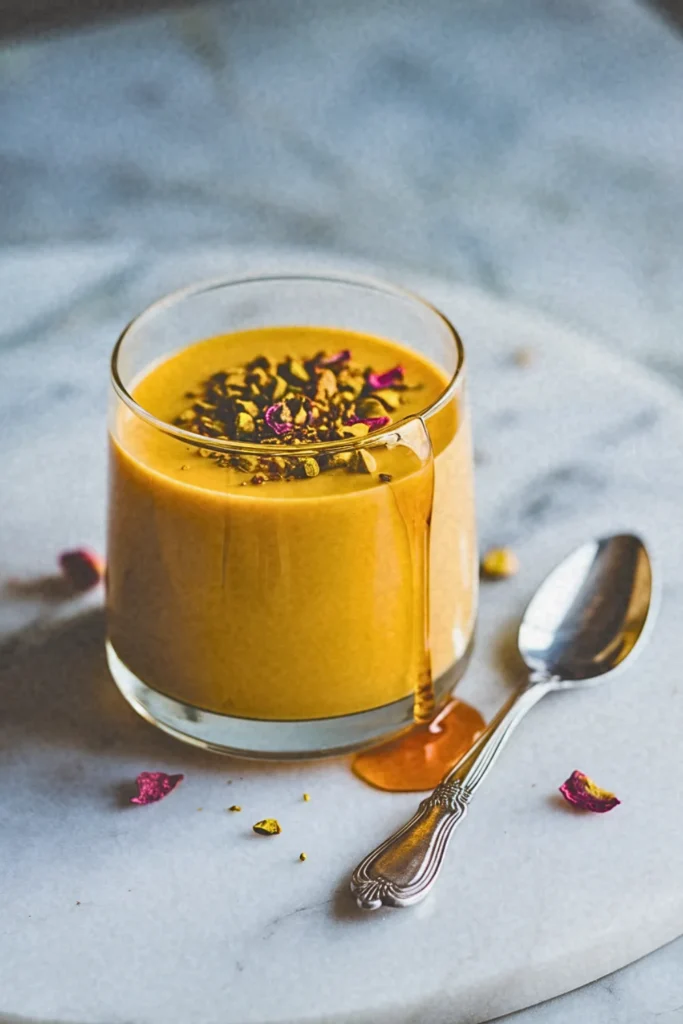
The anti-inflammatory golden milk trend meets Italian elegance. Agar agar sets this up into silky custard cups without any gelatin. It’s subtly spiced and not aggressively sweet, which I personally love.
Recipe Highlights
✅ Prep Time: 15 min
✅ Cook Time: 10 min
✅ Total Time: 25 min (plus 4 hours chilling)
✅ Servings: 6
✅ Estimated Cost: $14
✅ Calories per Serving: 220
✅ Dietary Info: Vegan, Gluten-Free, Dairy-Free, Anti-Inflammatory
Category
✅ Courses: Dessert
✅ Cuisines: Italian-Indian Fusion
Ingredients
For the Panna Cotta:
- 2 cans (13.5 oz each) full-fat coconut milk
- 1 cup unsweetened almond milk (or substitute oat milk for creamier texture)
- ⅓ cup maple syrup (or substitute agave nectar)
- 2 teaspoons ground turmeric
- 1 teaspoon ground ginger
- ½ teaspoon ground cinnamon
- ¼ teaspoon ground cardamom
- ⅛ teaspoon black pepper (enhances turmeric absorption)
- 2 tablespoons agar agar powder (not flakes, as the setting ratio differs significantly)
- 1 teaspoon vanilla extract
- Pinch of sea salt
For the Topping:
- 2 tablespoons crushed pistachios
- Edible dried rose petals (optional)
- Drizzle of maple syrup
Equipments
- Medium saucepan, 2. Whisk, 3. Measuring cups and spoons, 4. Six ramekins or small glasses (4 oz each), 5. Fine-mesh strainer, 6. Refrigerator
Step-by-Step Instructions
Step 1: Combine coconut milk, almond milk, maple syrup, turmeric, ginger, cinnamon, cardamom, black pepper, and salt in your saucepan. Whisk thoroughly until all the spices are evenly distributed throughout the liquid, ensuring no clumps remain.
Step 2: Sprinkle agar agar powder over the mixture and whisk vigorously to incorporate completely. Place the saucepan over medium heat and bring to a gentle simmer, whisking continuously for five minutes.
Step 3: Once the mixture reaches a simmer and the agar agar has completely dissolved, remove from heat immediately. Stir in vanilla extract and let the mixture cool for three minutes, which prevents a skin from forming on top.
Step 4: Strain the golden milk mixture through a fine-mesh strainer into a pouring vessel to remove any undissolved spice particles, creating an ultra-smooth final texture.
Step 5: Carefully pour the strained mixture into your ramekins or glasses, filling each about three-quarters full. This allows room for any toppings you’ll add later.
Step 6: Refrigerate the panna cottas uncovered for at least four hours or overnight until they’re completely set and have a gentle wobble when shaken. Before serving, garnish with crushed pistachios, rose petals, and a light maple syrup drizzle.
Final Notes
• This elegant fusion dessert harnesses turmeric’s anti-inflammatory compounds while agar agar provides the signature Italian panna cotta wobble without any animal-derived gelatin, creating a sophisticated treat that nourishes your body while delighting your palate.
6. Lavender Lemon Cheesecake Bars
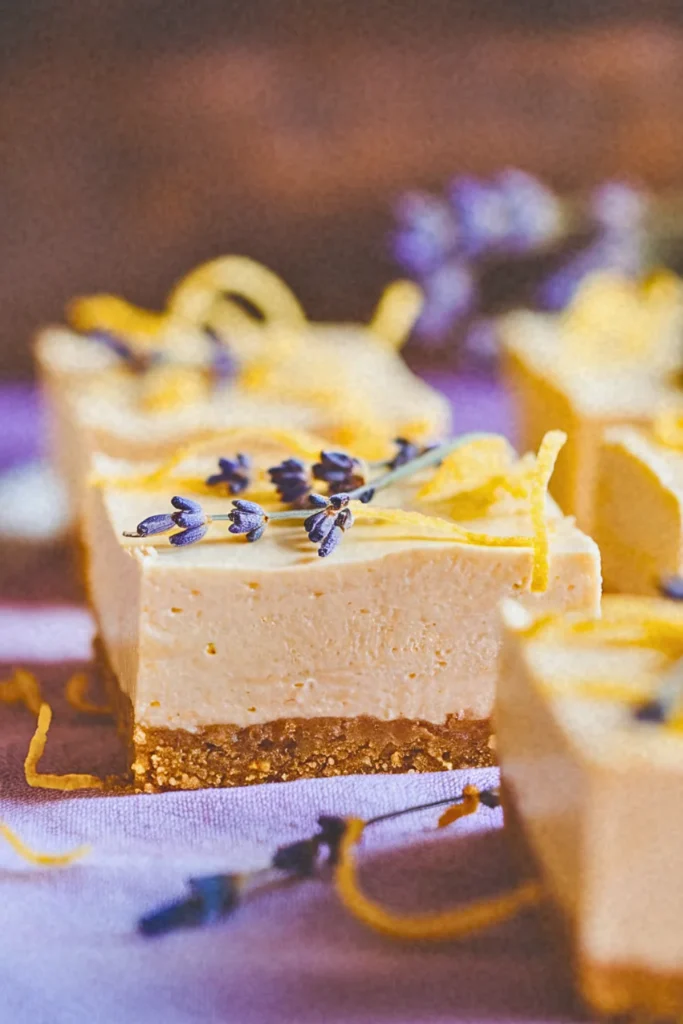
Culinary lavender adds this dreamy floral note that pairs beautifully with bright lemon. It’s refreshing and feels garden-party fancy but comes together in your food processor.
Recipe Highlights
✅ Prep Time: 20 min
✅ Chill Time: 4 hours
✅ Total Time: 4 hours 20 min
✅ Servings: 12 bars
✅ Estimated Cost: $18
✅ Calories per Serving: 285
✅ Dietary Info: Vegan, Gluten-Free Optional, Refined Sugar-Free Optional
Category
✅ Courses: Dessert
✅ Cuisines: American, French-Inspired
Ingredients
For the Crust:
- 1½ cups raw almonds (substitute with walnuts or pecans)
- 1 cup pitted Medjool dates (substitute with dried figs if dates unavailable)
- 2 tablespoons melted coconut oil
- Pinch of sea salt
For the Cheesecake Filling:
- 2 cups raw cashews, soaked 4 hours and drained
- ½ cup full-fat coconut cream
- ⅓ cup fresh lemon juice (about 2 lemons)
- ¼ cup maple syrup (substitute with agave nectar)
- 2 tablespoons culinary lavender buds
- 1 tablespoon lemon zest
- ¼ cup melted coconut oil
- 1 teaspoon vanilla extract
Equipments
- 8×8 inch square baking pan, 2. Parchment paper, 3. Food processor, 4. High-speed blender, 5. Measuring cups and spoons, 6. Mixing bowls, 7. Spatula
Step-by-Step Instructions
Step 1: Line your square pan with parchment paper, allowing overhang on the sides for easy removal later.
Step 2: Create the crust by pulsing almonds in your food processor until they form coarse crumbs. Add dates, coconut oil, and salt, then process until the mixture sticks together when pressed between your fingers.
Step 3: Press the crust mixture firmly and evenly into the prepared pan, creating a compact base layer. Place in the freezer while preparing the filling.
Step 4: Combine soaked cashews, coconut cream, lemon juice, maple syrup, lavender buds, lemon zest, melted coconut oil, and vanilla in your high-speed blender. Blend for two to three minutes until completely smooth and creamy with no graininess remaining.
Step 5: Pour the lavender-lemon filling over the chilled crust, spreading evenly with your spatula to reach all corners.
Step 6: Freeze the cheesecake bars for at least four hours or until completely firm throughout.
Step 7: Remove from freezer ten minutes before serving, lift out using parchment overhang, and slice into twelve equal bars with a sharp knife, wiping clean between cuts.
Final Notes
• Store these delicate cheesecake bars in an airtight container in the freezer for up to three weeks, or refrigerate for five days, though the texture becomes slightly softer when refrigerated rather than frozen solid.
7. Salted Miso Caramel Chocolate Cups
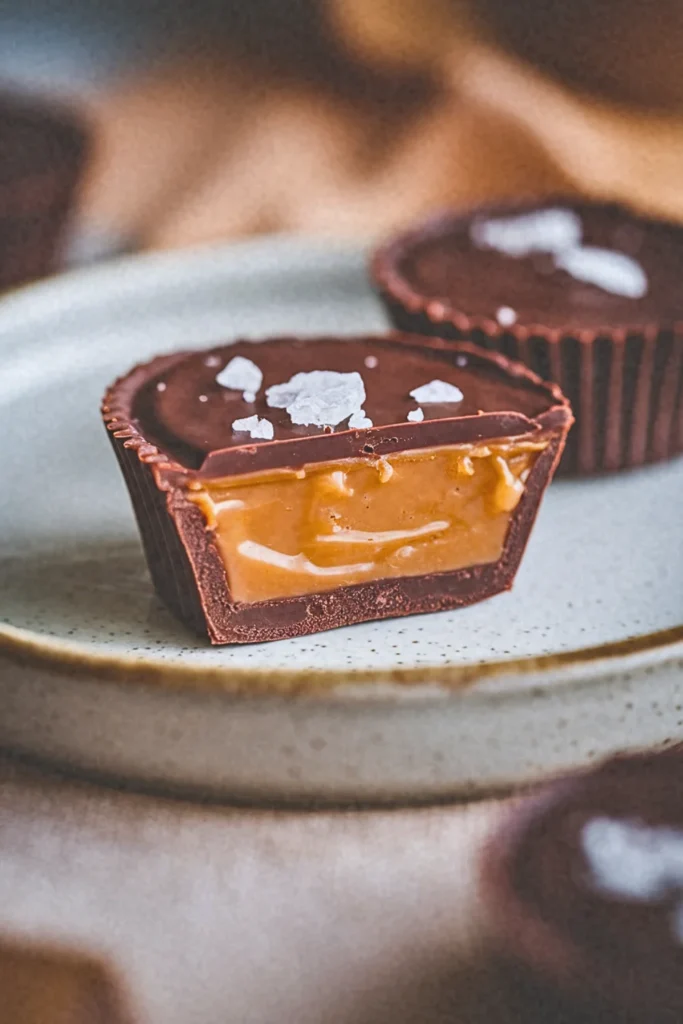
Miso paste in dessert sounds weird until you taste it. The umami depth it adds to sweet caramel is absolutely next level. Hide a dollop inside dark chocolate cups for a flavor bomb.
Recipe Highlights
✅ Prep Time: 25 min
✅ Chill Time: 2 hours
✅ Total Time: 2 hours 25 min
✅ Servings: 10 cups
✅ Estimated Cost: $16
✅ Calories per Serving: 245
✅ Dietary Info: Vegan, Gluten-Free, Refined Sugar-Free Optional
Category
✅ Courses: Dessert, Snacks
✅ Cuisines: Japanese-American Fusion
Ingredients
For the Chocolate Shell:
- 1½ cups vegan dark chocolate chips (substitute with chopped dark chocolate bar, 70% cacao)
- 2 tablespoons coconut oil
For the Miso Caramel:
- ½ cup almond butter (substitute with cashew or sunflower seed butter)
- ¼ cup maple syrup (substitute with date syrup)
- 2 tablespoons white miso paste
- 2 tablespoons melted coconut oil
- 1 teaspoon vanilla extract
- Flaky sea salt for topping
Equipments
- Mini muffin tin or silicone cup molds, 2. Paper cupcake liners, 3. Double boiler or microwave-safe bowl, 4. Mixing bowl, 5. Whisk or spoon, 6. Measuring cups and spoons, 7. Small spoon for layering
Step-by-Step Instructions
Step 1: Line your mini muffin tin with paper liners and set aside on your workspace.
Step 2: Melt the dark chocolate chips with coconut oil using a double boiler or microwave in thirty-second intervals, stirring between each interval until completely smooth and glossy.
Step 3: Spoon roughly one teaspoon of melted chocolate into each liner, tilting and swirling to coat the bottom and slightly up the sides, creating a cup shape. Refrigerate for fifteen minutes until firm.
Step 4: While chocolate sets, prepare your miso caramel by whisking together almond butter, maple syrup, miso paste, melted coconut oil, and vanilla extract in a bowl until thoroughly combined and creamy.
Step 5: Remove the chocolate cups from the refrigerator and spoon approximately one teaspoon of miso caramel into the center of each cup, leaving space around the edges for sealing.
Step 6: Cover the caramel completely with remaining melted chocolate, spreading gently to seal the edges and create a smooth top surface.
Step 7: Immediately sprinkle each cup with a small pinch of flaky sea salt before the chocolate sets.
Step 8: Refrigerate for at least two hours until completely firm throughout, then carefully peel away the paper liners before serving.
Final Notes
• These chocolate cups store beautifully in an airtight container in the refrigerator for two weeks or freeze for three months, making them perfect for preparing ahead for gatherings or satisfying sudden sweet cravings.
8. Hibiscus Berry Mousse
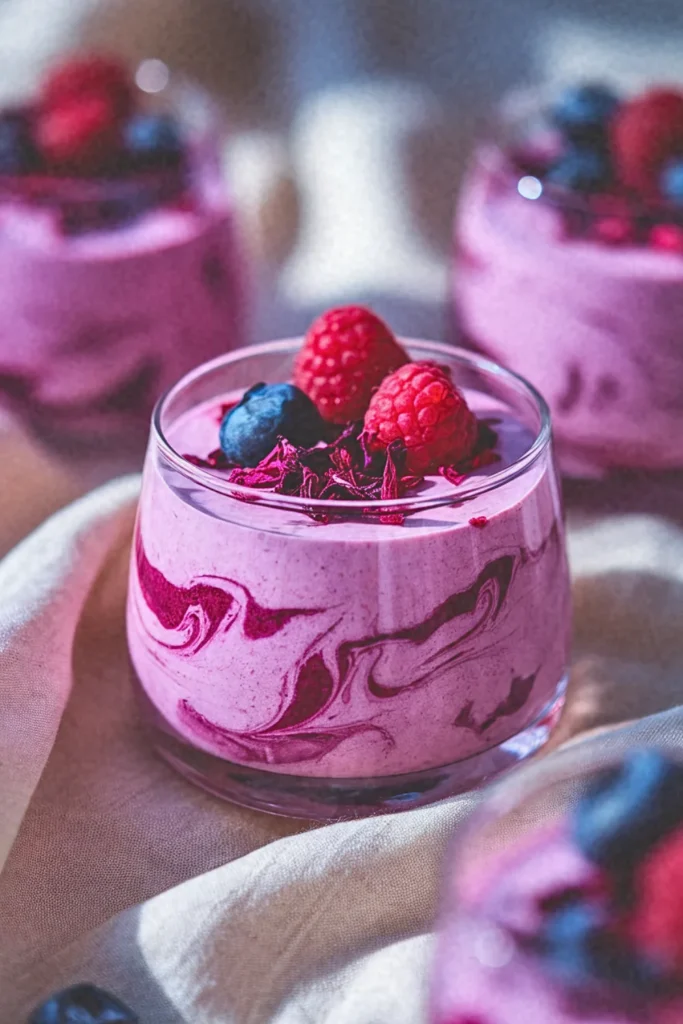
Dried hibiscus flowers steeped and blended with berries create this stunning magenta mousse that’s tart and refreshing. It’s naturally beautiful without any food coloring and tastes like summer captured in a bowl.
Recipe Highlights
✅ Prep Time: 15 min
✅ Chill Time: 3 hours
✅ Total Time: 3 hours 15 min
✅ Servings: 6 servings
✅ Estimated Cost: $14
✅ Calories per Serving: 220
✅ Dietary Info: Vegan, Gluten-Free, Refined Sugar-Free Optional
Category
✅ Courses: Dessert
✅ Cuisines: French-Inspired, Contemporary
Ingredients
For the Mousse Base:
- 1 can (13.5 oz) full-fat coconut milk, refrigerated overnight (substitute with coconut cream)
- 1 cup mixed fresh berries: strawberries, raspberries, blueberries (substitute with frozen berries, thawed)
- 3 tablespoons dried hibiscus flowers
- ¼ cup hot water for steeping
- ⅓ cup maple syrup (substitute with agave nectar)
- 1 teaspoon vanilla extract
- 2 tablespoons agar agar powder
For Garnish:
- Fresh berries
- Dried hibiscus petals
- Fresh mint leaves
Equipments
- Mixing bowls, 2. High-speed blender, 3. Fine mesh strainer, 4. Whisk or electric mixer, 5. Measuring cups and spoons, 6. Serving glasses or ramekins, 7. Spatula
Step-by-Step Instructions
Step 1: Steep the dried hibiscus flowers in hot water for ten minutes to create a concentrated tea, then strain through your fine mesh strainer, discarding the flower solids and reserving the vibrant magenta liquid.
Step 2: Carefully open your chilled coconut milk can without shaking it, scooping only the thick cream that has separated and risen to the top into your mixing bowl, setting aside the remaining liquid for other uses.
Step 3: Combine the mixed berries, hibiscus tea, maple syrup, and vanilla extract in your high-speed blender, processing until completely smooth and uniformly pureed.
Step 4: Transfer the berry-hibiscus mixture to a small saucepan and whisk in the agar agar powder thoroughly, ensuring no lumps remain in the mixture.
Step 5: Gently warm the berry mixture over medium-low heat for three to four minutes, stirring constantly until the agar agar dissolves completely, then remove from heat and allow cooling for five minutes to room temperature.
Step 6: Using your whisk or electric mixer, whip the coconut cream until light and fluffy with soft peaks forming, approximately two to three minutes of continuous beating.
Step 7: Gently fold the cooled berry-hibiscus mixture into the whipped coconut cream using your spatula, creating swirls rather than fully incorporating for a marbled effect, or mix completely for uniform color.
Step 8: Divide the mousse evenly among your serving glasses, then refrigerate for at least three hours until set and firm. Garnish with fresh berries, hibiscus petals, and mint leaves before serving.
Final Notes
• This elegant mousse showcases how agar agar creates structure without heat-setting like gelatin, while the tart hibiscus beautifully complements sweet berries, creating a sophisticated dessert that impresses guests while remaining remarkably simple to prepare.
9. Coconut Sticky Rice with Mango Cream
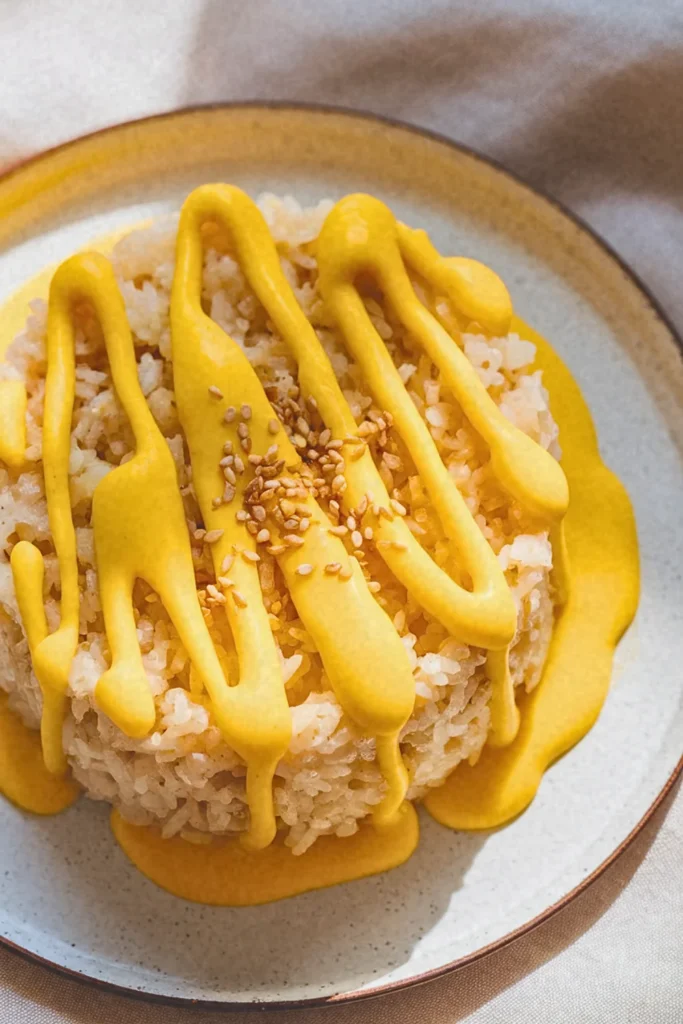
Taking inspiration from Thai desserts, this combines sweet coconut rice that needs no cooking with a blended mango topping. The textures play together perfectly and it feels exotic without being complicated.
Recipe Highlights
✅ Prep Time: 20 min
✅ Chill Time: 2 hours
✅ Total Time: 2 hours 20 min
✅ Servings: 4 servings
✅ Estimated Cost: $13
✅ Calories per Serving: 310
✅ Dietary Info: Vegan, Gluten-Free, Oil-Free
Category
✅ Courses: Dessert, Breakfast
✅ Cuisines: Thai, Southeast Asian
Ingredients
For the Coconut Sticky Rice:
- 1½ cups sushi rice or short-grain white rice, uncooked (substitute with jasmine rice for softer texture)
- 1 can (13.5 oz) full-fat coconut milk
- 3 tablespoons maple syrup (substitute with coconut sugar dissolved in liquid)
- ¼ teaspoon sea salt
- ½ cup cold water
For the Mango Cream:
- 2 ripe mangoes, peeled and diced (substitute with frozen mango chunks, thawed)
- ½ cup coconut cream
- 2 tablespoons maple syrup
- 1 teaspoon lime juice
For Garnish:
- Toasted sesame seeds
- Fresh mango slices
- Coconut flakes
Equipments
- Rice cooker or medium pot with lid, 2. High-speed blender, 3. Mixing bowls, 4. Measuring cups and spoons, 5. Spatula, 6. Serving bowls or plates
Step-by-Step Instructions
Step 1: Rinse your uncooked rice thoroughly under cold running water until the water runs clear, which removes excess starch and prevents the rice from becoming overly gummy once prepared.
Step 2: Cook the rice according to your rice cooker instructions or stovetop method with the cold water until tender and all liquid has been absorbed, then allow it to cool to room temperature for about fifteen minutes.
Step 3: While the rice cools, warm the coconut milk gently in a small saucepan over low heat, then stir in the maple syrup and sea salt until everything dissolves completely and creates a sweetened coconut mixture.
Step 4: Pour the warm sweetened coconut milk over the cooled rice and gently fold together using your spatula, ensuring every grain gets coated with the creamy coconut mixture without mashing the rice grains.
Step 5: Allow the coconut-infused rice to sit at room temperature for thirty minutes so the grains can absorb the flavors deeply, then refrigerate for at least two hours until the mixture becomes sticky and holds together when pressed.
Step 6: Create the mango cream by blending the diced mangoes, coconut cream, maple syrup, and lime juice in your high-speed blender until silky smooth and completely lump-free with a pourable consistency.
Step 7: To serve, press the chilled sticky rice into small mounds or shape into rounds using your hands, then plate each portion and drizzle generously with the vibrant mango cream.
Step 8: Finish each serving with a sprinkle of toasted sesame seeds, coconut flakes, and fresh mango slices for textural contrast and visual appeal.
Final Notes
• This no-bake adaptation captures traditional Thai mango sticky rice flavors while eliminating cooking complexity, making it perfect for warm weather when you want something refreshing, tropical, and satisfying without turning on your stove for extended periods.
10. Halva Inspired Tahini Fudge Swirl
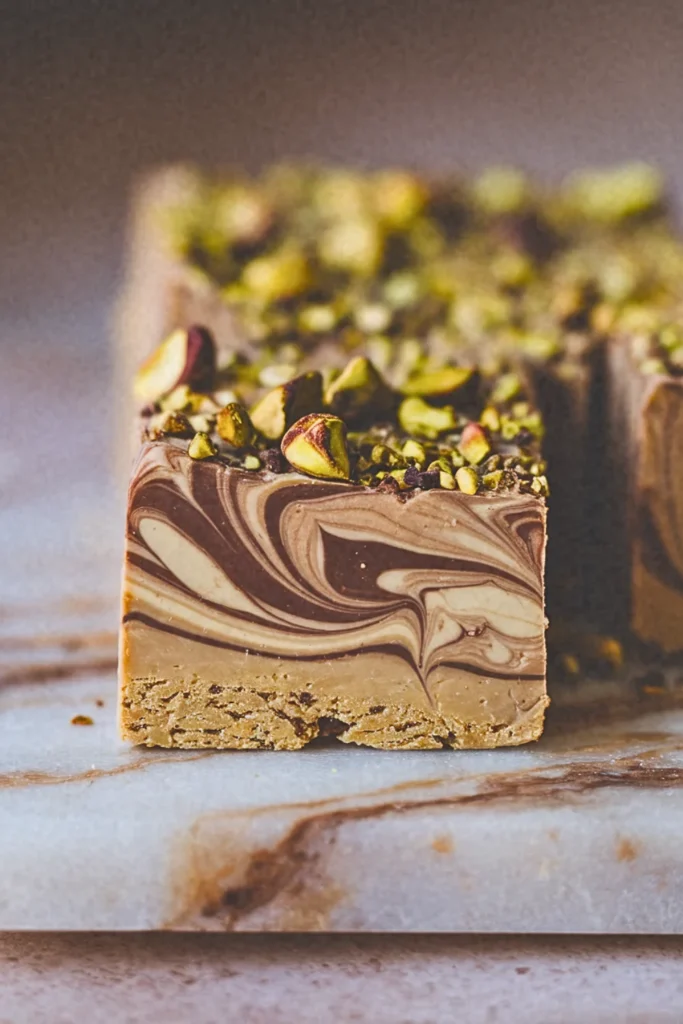
This goes beyond basic tahini fudge by adding pistachios, orange zest, and a touch of saffron if you’re feeling fancy. The marbled effect looks impressive and the flavor profile is completely unique.
Recipe Highlights
✅ Prep Time: 15 min
✅ Chill Time: 3 hours
✅ Total Time: 3 hours 15 min
✅ Servings: 16 pieces
✅ Estimated Cost: $15
✅ Calories per Serving: 195
✅ Dietary Info: Vegan, Gluten-Free, Refined Sugar-Free Optional
Category
✅ Courses: Dessert, Snacks
✅ Cuisines: Middle Eastern, Mediterranean
Ingredients
For the Tahini Base:
- 1 cup tahini, well-stirred (substitute with sunflower seed butter for nut-free option)
- ½ cup coconut oil, melted
- ⅓ cup maple syrup (substitute with date syrup for authentic flavor)
- 1 teaspoon vanilla extract
- ¼ teaspoon sea salt
- ½ cup coconut flour (substitute with almond flour)
For the Chocolate Swirl:
- ⅓ cup tahini
- 3 tablespoons cacao powder
- 3 tablespoons maple syrup
- 2 tablespoons melted coconut oil
- Pinch of sea salt
For Garnish:
- 2 tablespoons crushed pistachios
- 1 tablespoon sesame seeds
Equipments
- 8×8 inch square pan, 2. Parchment paper, 3. Two mixing bowls, 4. Whisk or spoon, 5. Measuring cups and spoons, 6. Butter knife or skewer for swirling, 7. Spatula
Step-by-Step Instructions
Step 1: Line your square pan with parchment paper, allowing the paper to hang over the edges which creates handles for lifting the finished fudge out later, making slicing much easier and preventing any sticking issues.
Step 2: Prepare the tahini base by whisking together the tahini, melted coconut oil, maple syrup, vanilla extract, and sea salt in your first mixing bowl until the mixture becomes completely smooth and unified without any oil separation visible.
Step 3: Gradually fold in the coconut flour using your spatula, working it through the wet mixture until you achieve a thick, creamy fudge consistency that holds together when pressed but remains spreadable and pliable.
Step 4: Pour this tahini base into your prepared pan and spread it evenly across the bottom using your spatula, smoothing the surface to create a uniform layer that reaches all corners.
Step 5: Create the chocolate swirl mixture by combining tahini, cacao powder, maple syrup, melted coconut oil, and salt in your second bowl, whisking vigorously until the chocolate mixture becomes glossy and completely lump-free.
Step 6: Drizzle the chocolate mixture over the tahini base in random lines and dollops, distributing it across the entire surface rather than concentrating it in one area.
Step 7: Take your butter knife or skewer and drag it through both layers in swirling motions, creating beautiful marble patterns that mimic traditional halva’s distinctive appearance while ensuring every bite contains both flavors.
Step 8: Sprinkle the crushed pistachios and sesame seeds evenly over the top, gently pressing them into the surface so they adhere properly during chilling.
Step 9: Refrigerate for at least three hours until the fudge becomes completely firm and sliceable, then lift out using the parchment overhang and cut into sixteen equal squares.
Final Notes
• This fudge captures halva’s characteristic crumbly-yet-creamy texture through the combination of tahini and coconut flour, while the chocolate swirl adds visual drama and flavor complexity that makes this confection feel special enough for gifting or celebrations.

Hi, I’m Aldvin Gomes, a passionate vegan and foodie on a mission to make plant-based eating effortless and exciting. I share new vegan recipes every day, so you never have to stress about what to cook. Whether you’re a longtime vegan or just exploring plant-based meals, my goal is to keep your plate full of delicious, wholesome, and easy-to-make dishes. I’m here to help you enjoy every bite. Join me in exploring the endless possibilities of vegan cooking, one delicious recipe at a time!