Thanksgiving vegan desserts transform your holiday table into a guilt-free paradise that even omnivores can’t resist – promise.
I’ll never forget my first vegan Thanksgiving disaster…
Picture a sunken pumpkin pie that looked more like orange soup, and guests politely pushing around what I optimistically called “chocolate avocado mousse.” My aunt actually asked if I was feeling okay. Ouch.
But here’s the thing about vegan holiday desserts – they’re not about sacrifice anymore. They’re about discovery.
After years of kitchen experiments (and yes, more failures), I’ve learned that the best Thanksgiving vegan desserts often outshine their traditional counterparts.
We’re talking about desserts so rich and decadent that nobody asks about the missing eggs or butter.
These eleven easy vegan desserts will completely change how you think about holiday baking.
From gluten-free options that don’t taste like cardboard to guilt-free treats that actually satisfy your sweet tooth, each recipe brings something special to your Thanksgiving spread.
Some take just minutes to prepare, while others become conversation starters.
Must-Try: 11 Healthy Vegan Desserts.
11 Thanksgiving Vegan Desserts

Whether you’re hosting your first vegan Thanksgiving or looking to surprise traditional eaters, these desserts prove that plant-based doesn’t mean pleasure-free.
Ready to create some holiday magic that everyone will remember?
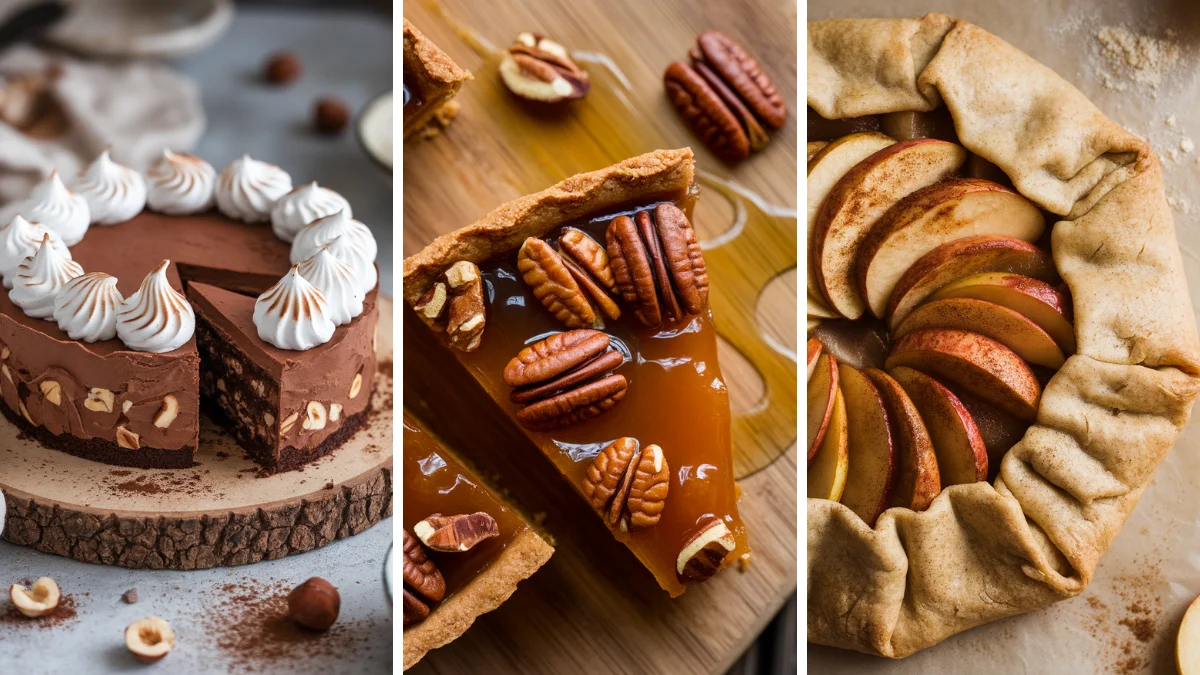
1. Maple Bourbon Pecan Tart with Almond Flour Crust
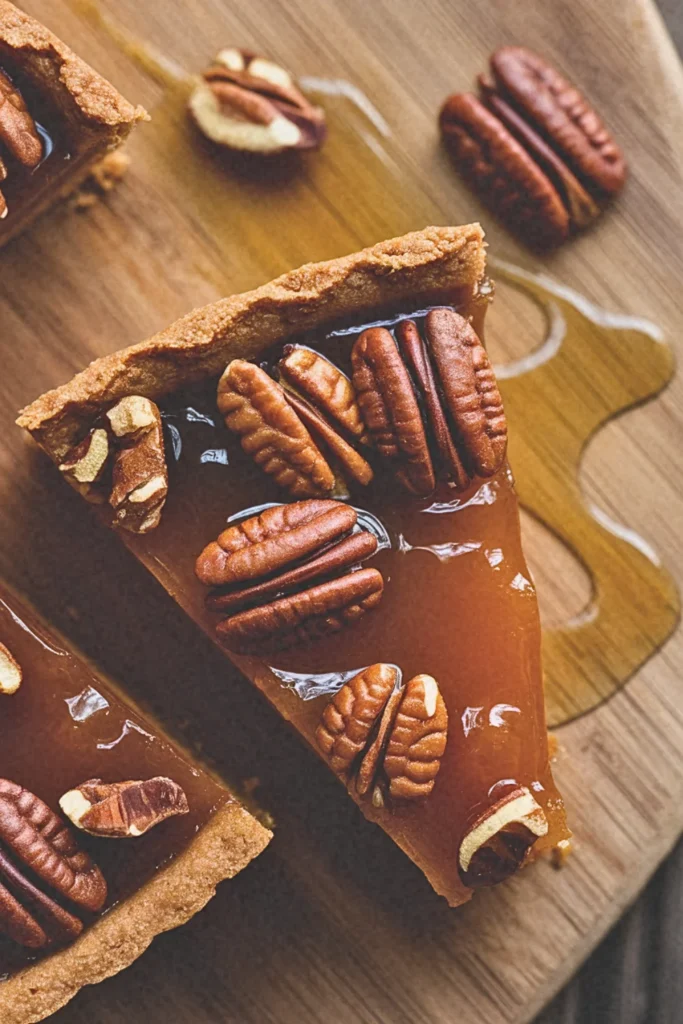
This sophisticated dessert combines the warming flavors of autumn with a naturally gluten-free almond flour base. The filling uses aquafaba as a binding agent, creating that perfect sticky-sweet consistency without corn syrup.
Recipe Highlights (Quick Glance Section)
✅ Prep Time: 25 min
✅ Cook Time: 35 min
✅ Total Time: 60 min
✅ Servings: 8
✅ Estimated Cost: $18
✅ Calories per Serving: 285
✅ Dietary Info: Vegan, Gluten-Free, Refined Sugar-Free
Category
✅ Courses: Dessert
✅ Cuisines: American
Ingredients
For the Crust:
- 2 cups almond flour (substitute: oat flour for nut-free option)
- 3 tablespoons coconut oil, melted (substitute: vegan butter)
- 2 tablespoons maple syrup (substitute: agave nectar)
- 1/4 teaspoon sea salt
For the Filling:
- 1 1/2 cups raw pecans, roughly chopped
- 1/2 cup pure maple syrup
- 1/4 cup coconut cream, thick part only (substitute: cashew cream)
- 3 tablespoons bourbon (substitute: vanilla extract)
- 2 tablespoons ground flaxseed mixed with 6 tablespoons water
- 1 teaspoon vanilla extract
- 1/2 teaspoon cinnamon
- 1/4 teaspoon sea salt
Equipment
- 9-inch tart pan with removable bottom, 2. Large mixing bowl, 3. Medium mixing bowl, 4. Measuring cups and spoons, 5. Fork for mixing, 6. Oven
Step-by-Step Instructions
Step 1: Preheat your oven to 350°F and lightly grease your tart pan. Understanding proper temperature control ensures your crust bakes evenly without burning the delicate almond flour.
Step 2: Combine all crust ingredients in a large bowl, mixing until the mixture resembles wet sand. This texture indicates proper fat distribution throughout the flour.
Step 3: Press the crust mixture firmly into your tart pan, creating even thickness on bottom and sides. Use the bottom of a measuring cup to achieve uniform compression.
Step 4: Pre-bake the crust for 12 minutes until lightly golden. This partial baking prevents a soggy bottom when you add the liquid filling.
Step 5: Meanwhile, whisk together maple syrup, coconut cream, bourbon, flaxseed mixture, vanilla, cinnamon, and salt until completely smooth. The flaxseed mixture acts as your binding agent, replacing traditional eggs.
Step 6: Arrange chopped pecans evenly over the pre-baked crust, then pour the maple mixture over top, ensuring even distribution.
Step 7: Bake for 23-25 minutes until the filling appears set but still has a slight jiggle in the center. Overbaking creates a tough, rubbery texture.
Step 8: Cool completely before removing from pan, allowing the filling to firm up properly for clean slices.
Final Notes
• The bourbon adds sophisticated depth without overwhelming alcohol taste, as most evaporates during baking, leaving behind complex vanilla and caramel notes that complement the maple beautifully.
2. Spiced Pumpkin Cheesecake with Cashew Base

A creamy, dairy-free cheesecake that rivals any traditional version. Soaked cashews create an incredibly smooth texture, while pumpkin puree and warming spices deliver classic fall flavors.
Recipe Highlights (Quick Glance Section)
✅ Prep Time: 30 min
✅ Cook Time: 0 min (No-Bake)
✅ Total Time: 4 hours 30 min (includes chilling)
✅ Servings: 12
✅ Estimated Cost: $22
✅ Calories per Serving: 320
✅ Dietary Info: Vegan, Gluten-Free, No-Bake, Refined Sugar-Free
Category
✅ Courses: Dessert
✅ Cuisines: American
Ingredients
For the Crust:
- 2 cups pitted Medjool dates (substitute: 1 3/4 cups regular dates plus 2 tablespoons water)
- 1 1/2 cups raw walnuts (substitute: pecans or almonds)
- 1/4 teaspoon sea salt
- 1 teaspoon vanilla extract
For the Filling:
- 3 cups raw cashews, soaked 4 hours (substitute: 2 1/2 cups cashew butter for quicker prep)
- 1 cup pumpkin puree, not pumpkin pie filling
- 1/2 cup coconut cream, thick part only (substitute: silken tofu for lighter texture)
- 1/3 cup maple syrup (substitute: agave nectar)
- 1/4 cup melted coconut oil
- 2 teaspoons vanilla extract
- 1 1/2 teaspoons pumpkin pie spice
- 1/2 teaspoon ground cinnamon
- 1/4 teaspoon sea salt
Equipment
- 9-inch springform pan, 2. Food processor, 3. High-speed blender, 4. Large mixing bowl, 5. Measuring cups and spoons, 6. Rubber spatula, 7. Refrigerator space for chilling
Step-by-Step Instructions
Step 1: Begin by soaking your cashews in warm water for at least four hours or overnight. This softening process is crucial because it allows the cashews to blend into an impossibly smooth, cream-like consistency that mimics traditional dairy cheesecake perfectly.
Step 2: Process dates, walnuts, salt, and vanilla in your food processor until the mixture forms a sticky dough that holds together when pressed. The natural sugars in dates act as both sweetener and binding agent, creating structure without refined ingredients.
Step 3: Press this mixture firmly into your springform pan, creating an even layer across the bottom and slightly up the sides. This forms your foundation and provides textural contrast to the smooth filling.
Step 4: Drain and rinse your soaked cashews thoroughly, then blend them with all filling ingredients until completely smooth. This process may take several minutes in a regular blender, so be patient as the transformation from grainy to silky occurs gradually.
Step 5: Pour the filling over your prepared crust, using a spatula to smooth the top surface and eliminate any air bubbles that could create texture issues.
Step 6: Refrigerate for at least four hours or overnight until the cheesecake sets completely. The coconut oil will solidify during chilling, creating the firm yet creamy texture characteristic of traditional cheesecake.
Step 7: Run a knife around the edges before removing the springform ring to ensure clean release without cracking your beautiful creation.
Final Notes
• Soaking cashews overnight produces the silkiest texture, but you can quick-soak in boiling water for thirty minutes if time is limited, though results may be slightly grainier.
3. Chocolate Avocado Mousse with Coconut Whip
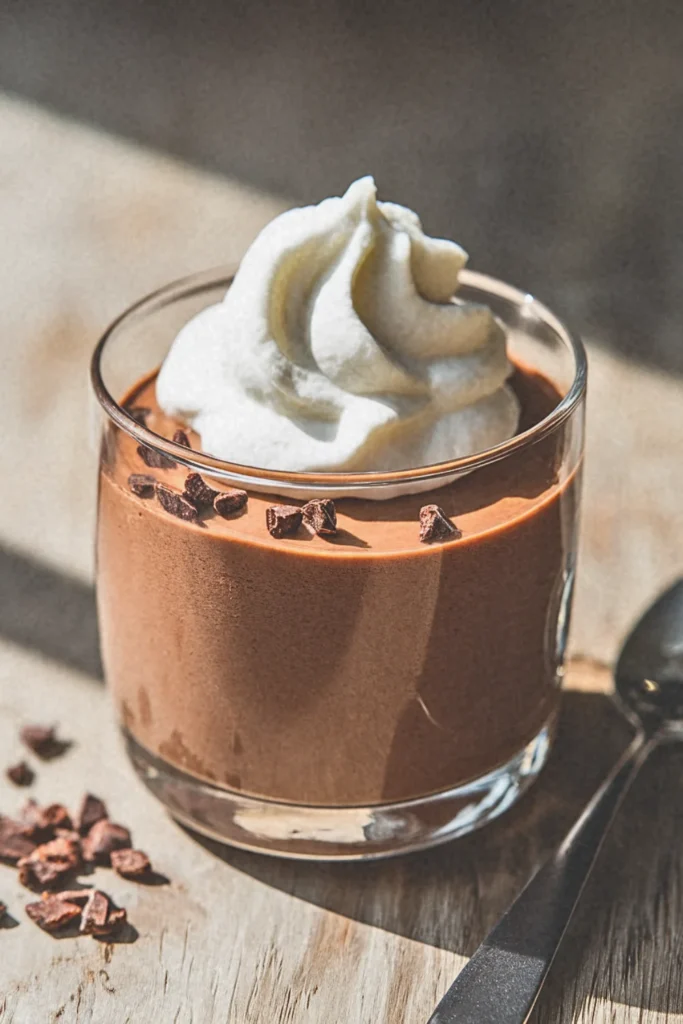
This guilt-free indulgence proves that healthy can be decadent. Ripe avocados create an impossibly silky texture while dates provide natural sweetness without refined sugars.
Recipe Highlights (Quick Glance Section)
✅ Prep Time: 15 min
✅ Cook Time: 0 min (No-Cook)
✅ Total Time: 2 hours 15 min (includes chilling)
✅ Servings: 6
✅ Estimated Cost: $14
✅ Calories per Serving: 245
✅ Dietary Info: Vegan, Gluten-Free, Raw, Paleo-Friendly, Refined Sugar-Free
Category
✅ Courses: Dessert
✅ Cuisines: French-inspired
Ingredients
For the Chocolate Mousse:
- 3 large ripe avocados, about 2 cups when mashed (substitute: silken tofu for lighter texture but less richness)
- 1/3 cup unsweetened cocoa powder (substitute: cacao powder for deeper flavor)
- 1/4 cup pure maple syrup (substitute: agave nectar or date syrup)
- 1/4 cup melted coconut oil
- 2 teaspoons vanilla extract
- 1/4 teaspoon sea salt
- 2-4 tablespoons non-dairy milk as needed for consistency
For the Coconut Whip:
- 1 can full-fat coconut milk, chilled overnight (substitute: cashew cream for nut-based option)
- 2 tablespoons powdered sugar (substitute: maple syrup)
- 1 teaspoon vanilla extract
Equipment
- Food processor or high-speed blender, 2. Electric hand mixer or stand mixer, 3. Large mixing bowl, 4. Medium mixing bowl, 5. Measuring cups and spoons, 6. Rubber spatula, 7. Serving glasses or bowls, 8. Refrigerator space for chilling
Step-by-Step Instructions
Step 1: Understanding avocado selection becomes crucial for this dessert’s success. Choose avocados that yield slightly to gentle pressure but aren’t overly soft, as overripe fruit can introduce unwanted flavors that compete with the chocolate. The natural fats in perfectly ripe avocados create the luxurious mouthfeel that makes this mousse so satisfying.
Step 2: Scoop avocado flesh into your food processor along with cocoa powder, maple syrup, melted coconut oil, vanilla, and salt. The order of ingredients matters here because starting with the avocado base allows other flavors to incorporate more evenly throughout the mixture.
Step 3: Process the mixture for two to three minutes until completely smooth, stopping occasionally to scrape down sides. This extended processing time eliminates any grittiness and ensures the cocoa powder fully dissolves, creating that signature silky texture that defines quality mousse.
Step 4: Add non-dairy milk one tablespoon at a time if the mixture appears too thick. The ideal consistency should coat a spoon but still fall easily when lifted, similar to thick pudding rather than frosting.
Step 5: For the coconut whip, remove only the thick cream from your chilled coconut milk can, leaving the liquid behind. This separation occurs naturally during refrigeration and provides the fat content necessary for proper whipping.
Step 6: Whip the coconut cream with powdered sugar and vanilla for three to four minutes until light peaks form. The transformation from thick cream to airy whip happens gradually, so patience ensures optimal volume and texture.
Step 7: Divide mousse among serving glasses and refrigerate for at least two hours to firm up properly. This chilling period allows flavors to meld while the coconut oil sets, creating the perfect spoon-holding consistency.
Final Notes
• The avocado flavor completely disappears when properly balanced with cocoa and sweetener, leaving only rich chocolate taste with incredible creaminess that surpasses traditional dairy-based mousses.
4. Apple Cinnamon Galette with Oat Flour Pastry
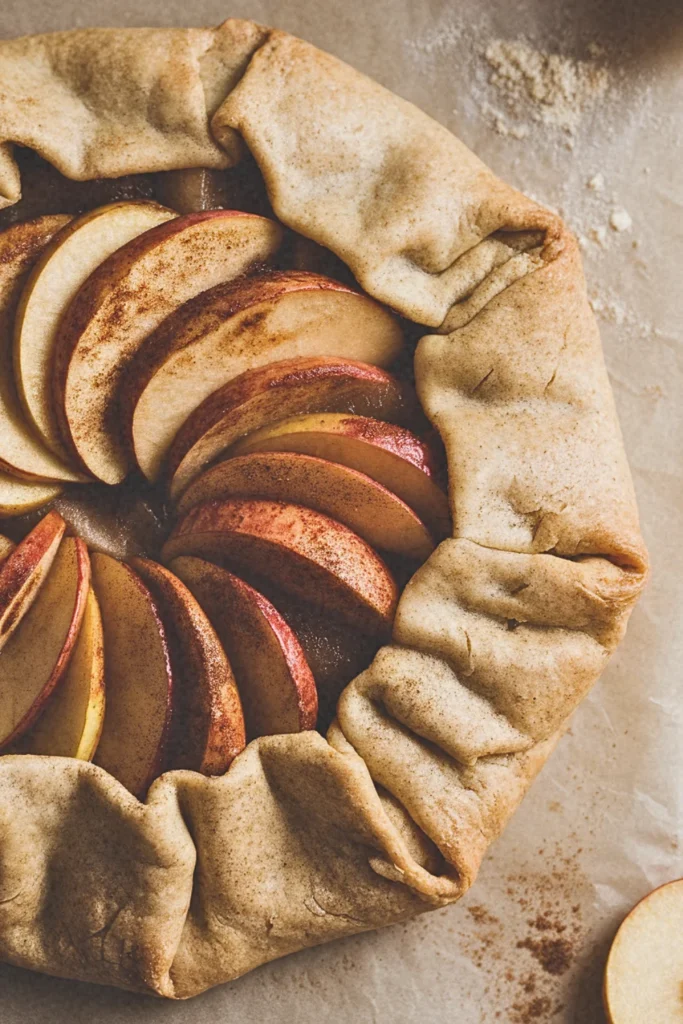
A rustic, free-form tart that celebrates the beauty of imperfection. The oat flour crust remains tender and flaky while accommodating gluten-sensitive guests effortlessly.
Recipe Highlights (Quick Glance Section)
✅ Prep Time: 25 min
✅ Cook Time: 35 min
✅ Total Time: 60 min
✅ Servings: 6
✅ Estimated Cost: $8
✅ Calories per Serving: 285
✅ Dietary Info: Vegan, Gluten-Free, Refined Sugar-Free
Category
✅ Courses: Dessert, Brunch
✅ Cuisines: French-American
Ingredients
For the Oat Flour Pastry:
- 1½ cups oat flour (or blend 1¾ cups rolled oats until fine)
- 3 tablespoons coconut sugar (substitute: maple syrup)
- ½ teaspoon salt
- 6 tablespoons cold vegan butter (substitute: coconut oil, chilled)
- 3-4 tablespoons ice water
For the Apple Filling:
- 4 medium apples, thinly sliced (Honeycrisp or Granny Smith work beautifully)
- 2 tablespoons coconut sugar
- 1 teaspoon ground cinnamon
- ¼ teaspoon nutmeg
- 1 tablespoon cornstarch
- 1 tablespoon lemon juice
- 2 tablespoons plant milk for brushing
Equipment
- Food processor, 2. Large mixing bowl, 3. Rolling pin, 4. Parchment paper, 5. Baking sheet, 6. Sharp knife, 7. Pastry brush
Step-by-Step Instructions
Step 1: Preheat your oven to 400°F (200°C). This temperature creates the perfect balance between cooking the pastry through while caramelizing the apple edges without burning.
Step 2: Create the pastry by combining oat flour, coconut sugar, and salt in a food processor. Pulse to blend these dry ingredients evenly, which ensures consistent flavor throughout your crust.
Step 3: Add cold vegan butter in small cubes to the flour mixture. Pulse until the mixture resembles coarse breadcrumbs with some pea-sized butter pieces remaining. These butter pieces create the flaky texture that makes galettes so delightful.
Step 4: Gradually add ice water one tablespoon at a time while pulsing, until the dough just comes together when pinched. The dough should feel slightly tacky but not sticky.
Step 5: Form the dough into a disc, wrap in plastic, and refrigerate for 15 minutes. This chilling step allows the flour to hydrate properly and makes rolling much easier.
Step 6: Meanwhile, prepare your apple filling by tossing sliced apples with coconut sugar, cinnamon, nutmeg, cornstarch, and lemon juice. The cornstarch prevents excess moisture from making your pastry soggy.
Step 7: Roll the chilled dough into a 12-inch circle on parchment paper. Don’t worry about perfect edges – rustic charm is what makes galettes special.
Step 8: Arrange apple slices in overlapping concentric circles, leaving a 2-inch border. Fold the pastry edges up and over the fruit, pleating as needed to create an attractive rustic border.
Step 9: Brush the pastry edges with plant milk for a beautiful golden finish, then bake for 35-40 minutes until the crust is golden and apples are tender.
Step 10: Cool for 10 minutes before serving. This brief cooling allows the filling to set slightly while keeping the galette warm and inviting.
Final Notes
• The key to perfect galette pastry lies in keeping your vegan butter cold throughout the process, as this creates the flaky, buttery layers that make each bite absolutely irresistible and satisfying.
5. Cranberry Orange Chia Pudding Parfait
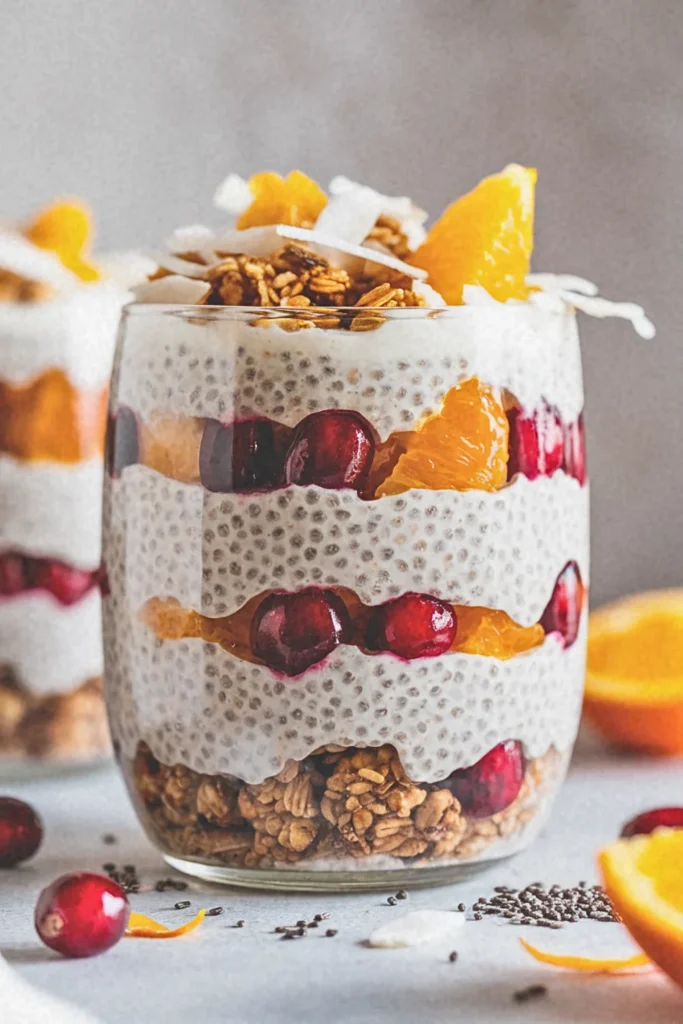
This make-ahead dessert layers creamy chia pudding with tart cranberry compote and bright orange zest. Each spoonful delivers different textures and complementary flavors.
Recipe Highlights (Quick Glance Section)
✅ Prep Time: 15 min
✅ Cook Time: 0 min (chilling time 4 hours)
✅ Total Time: 4 hours 15 min
✅ Servings: 4
✅ Estimated Cost: $9
✅ Calories per Serving: 245
✅ Dietary Info: Vegan, Gluten-Free, High-Protein, Raw
Category
✅ Courses: Breakfast, Dessert, Snack
✅ Cuisines: Modern American, Health-Conscious
Ingredients
For the Chia Pudding Base:
- ¼ cup chia seeds (substitute: ground flaxseeds for different texture)
- 1½ cups coconut milk, full-fat (substitute: almond or oat milk)
- 3 tablespoons maple syrup (substitute: agave nectar)
- 1 teaspoon vanilla extract
- Zest of 1 large orange
- 2 tablespoons fresh orange juice
- Pinch of sea salt
For the Cranberry Layer:
- ½ cup dried cranberries, unsweetened (substitute: fresh cranberries, chopped)
- 2 tablespoons orange juice
- 1 tablespoon maple syrup
For Assembly:
- ½ cup granola, homemade or store-bought
- ¼ cup toasted coconut flakes (substitute: chopped almonds)
- Fresh orange segments for garnish
Equipment
- Medium mixing bowl, 2. Whisk, 3. Fine-mesh strainer, 4. Small saucepan, 5. Four clear glasses or jars, 6. Measuring cups, 7. Zester or microplane
Step-by-Step Instructions
Step 1: Begin by understanding that chia seeds are nutritional powerhouses containing omega-3 fatty acids, protein, and fiber. When they absorb liquid, they expand to create a pudding-like consistency that forms the foundation of this parfait.
Step 2: In your medium bowl, whisk together coconut milk, maple syrup, vanilla extract, orange zest, orange juice, and sea salt until completely combined. The orange zest contains essential oils that provide intense citrus flavor, while the juice adds bright acidity that balances the rich coconut milk.
Step 3: Add chia seeds to the liquid mixture and whisk vigorously for two minutes. This initial whisking prevents the seeds from clumping together, which is crucial for achieving a smooth, pudding-like texture rather than a lumpy mixture.
Step 4: Let the mixture sit for five minutes, then whisk again thoroughly. This second whisking breaks up any clusters that may have formed as the seeds begin their absorption process.
Step 5: Cover the bowl and refrigerate for at least four hours or overnight. During this time, the chia seeds will absorb the liquid and swell to create a gel-like consistency that mimics traditional pudding.
Step 6: Meanwhile, prepare the cranberry layer by combining dried cranberries, orange juice, and maple syrup in a small saucepan. Gently warm over low heat for three minutes, allowing the cranberries to plump and absorb the orange flavors.
Step 7: Remove cranberries from heat and let cool completely. This brief cooking process rehydrates dried cranberries while infusing them with complementary orange notes.
Step 8: When ready to serve, give the chia pudding a final stir to ensure smooth consistency. The pudding should coat a spoon and hold its shape when spooned.
Step 9: Layer the parfait by spooning chia pudding into each glass, followed by the cranberry mixture, then granola. Repeat layers as desired, creating visual appeal through alternating textures and colors.
Step 10: Top each parfait with toasted coconut flakes and fresh orange segments. Serve immediately for optimal textural contrast between creamy pudding, chewy cranberries, and crunchy granola.
Final Notes
• The magic happens during the overnight chill when chia seeds transform from tiny seeds into gel-like spheres that create a luxuriously creamy pudding without any cooking required whatsoever.
6. Sweet Potato Pie Bars with Walnut Date Crust
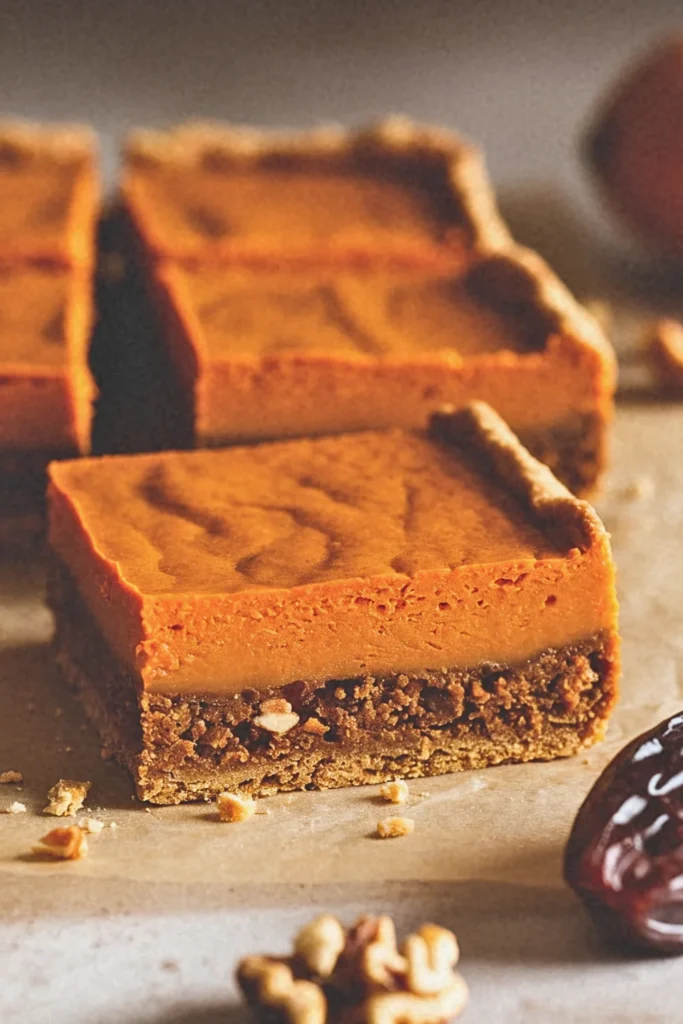
These handheld treats offer all the comfort of traditional sweet potato pie in a more convenient format. The pressed crust eliminates rolling challenges while remaining completely grain-free.
Recipe Highlights (Quick Glance Section)
✅ Prep Time: 30 min
✅ Cook Time: 45 min
✅ Total Time: 75 min (plus 2 hours cooling)
✅ Servings: 12
✅ Estimated Cost: $11
✅ Calories per Serving: 265
✅ Dietary Info: Vegan, Gluten-Free, Refined Sugar-Free, Raw Crust
Category
✅ Courses: Dessert, Holiday Treats
✅ Cuisines: Southern American, Modern Plant-Based
Ingredients
For the Walnut Date Crust:
- 2 cups raw walnuts (substitute: pecans for traditional Southern flavor)
- 1 cup Medjool dates, pitted (substitute: dried figs for different sweetness profile)
- 1 teaspoon vanilla extract
- ¼ teaspoon sea salt
- 1 teaspoon cinnamon
For the Sweet Potato Filling:
- 2 pounds sweet potatoes, roasted and peeled
- ¾ cup full-fat coconut milk (substitute: cashew cream for ultra-richness)
- ⅓ cup pure maple syrup (substitute: date syrup for deeper molasses notes)
- ¼ cup tapioca starch (substitute: cornstarch, though tapioca creates better texture)
- 2 teaspoons vanilla extract
- 1½ teaspoons cinnamon
- ½ teaspoon nutmeg
- ¼ teaspoon ground ginger
- ⅛ teaspoon ground cloves
- ½ teaspoon sea salt
Equipment
- Food processor, 2. 9×13 inch baking pan, 3. Parchment paper, 4. Large mixing bowl, 5. Potato masher or immersion blender, 6. Measuring cups, 7. Baking sheet for roasting sweet potatoes
Step-by-Step Instructions
Step 1: Understanding the foundation of these bars begins with properly roasting your sweet potatoes, which concentrates their natural sugars and creates the deep, caramelized flavors that make sweet potato pie so beloved. Pierce whole sweet potatoes with a fork and roast at 400°F for 45-60 minutes until completely tender when squeezed.
Step 2: While the sweet potatoes roast, prepare your revolutionary no-bake crust by processing walnuts in the food processor until they form fine crumbs, but stop before they become nut butter. This texture provides the perfect foundation that holds together while maintaining pleasant bite.
Step 3: Add pitted dates to the walnut crumbs and process until the mixture begins to clump together when pressed between your fingers. The natural sugars and fiber in dates act as both sweetener and binding agent, eliminating the need for traditional flour and butter combinations.
Step 4: Incorporate vanilla, salt, and cinnamon into the crust mixture, pulsing briefly to distribute evenly. These spices complement both the nuts and the sweet potato filling while adding aromatic depth that makes each bite more complex.
Step 5: Press the crust mixture firmly into your parchment-lined baking pan, creating an even layer that extends slightly up the sides. Use the bottom of a measuring cup to ensure uniform thickness, which prevents weak spots that might crack when cutting.
Step 6: Once sweet potatoes are cool enough to handle, remove skins and mash the flesh until completely smooth. Any lumps will create textural inconsistencies in your final bars, so take time to achieve silky smoothness using either a potato masher or immersion blender.
Step 7: Combine the mashed sweet potatoes with coconut milk, maple syrup, and all spices in your large bowl. The coconut milk provides richness while the maple syrup enhances the natural sweetness without overpowering the sweet potato’s earthy flavor profile.
Step 8: Whisk in tapioca starch thoroughly, ensuring no lumps remain. Tapioca starch creates a cleaner set than cornstarch and provides that characteristic smooth, sliceable texture that defines perfect pie bars.
Step 9: Pour the filling over the crust and smooth the top with a spatula. The filling should completely cover the crust while remaining level for even baking and attractive presentation when cut.
Step 10: Bake at 350°F for 40-45 minutes until the center is just set but still slightly jiggly. Cool completely before refrigerating for at least two hours, which allows the filling to firm up properly for clean slicing.
Final Notes
• The secret to perfect texture lies in achieving completely smooth sweet potato puree and allowing adequate cooling time, which transforms the soft filling into firm, sliceable bars.
7. Vanilla Bean Panna Cotta with Berry Compote
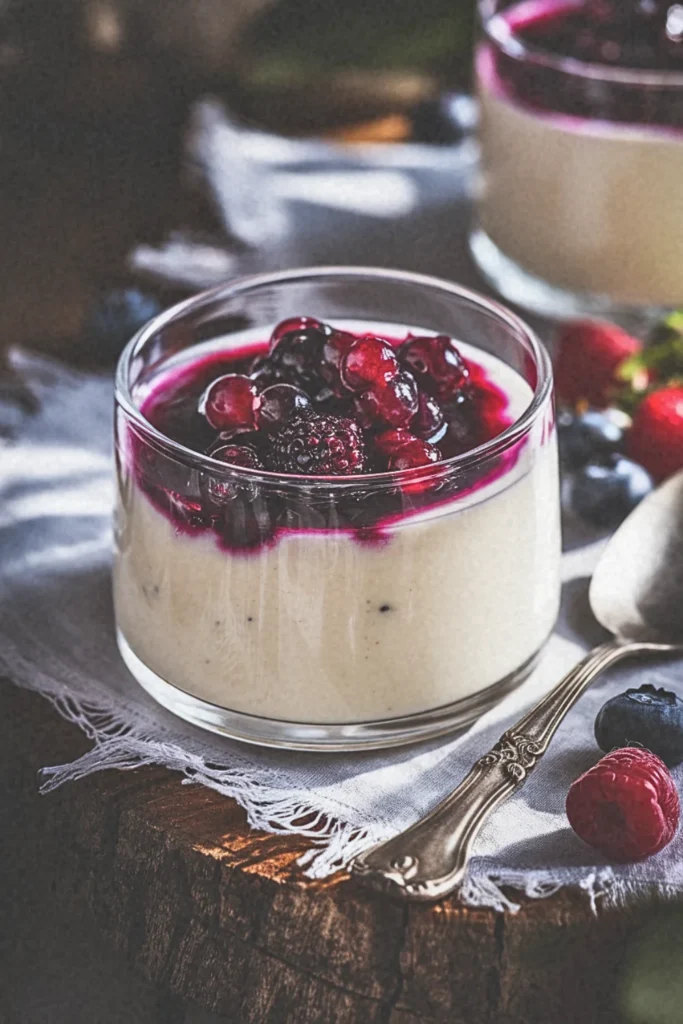
Agar-agar creates the signature wobble of traditional panna cotta without any dairy. Coconut cream provides richness while vanilla beans add visual elegance and aromatic depth.
Recipe Highlights (Quick Glance Section)
✅ Prep Time: 20 min
✅ Cook Time: 15 min
✅ Total Time: 35 min (plus 4 hours chilling)
✅ Servings: 4
✅ Estimated Cost: $15
✅ Calories per Serving: 280
✅ Dietary Info: Vegan, Gluten-Free, Refined Sugar-Free
Category
✅ Courses: Dessert
✅ Cuisines: French-Italian Fusion
Ingredients
For Panna Cotta:
- 1 can (400ml) full-fat coconut milk
- 1/2 cup cashew cream (or additional coconut milk)
- 1/3 cup maple syrup (substitute: agave nectar)
- 1 vanilla bean pod, scraped (substitute: 2 tsp vanilla extract)
- 2 tsp agar powder (substitute: 4 tsp agar flakes)
- Pinch of sea salt
For Berry Compote:
- 2 cups mixed berries (strawberries, blueberries, raspberries)
- 3 tbsp maple syrup
- 1 tbsp lemon juice
- 1 tsp cornstarch mixed with 2 tbsp water
Equipment
- Medium saucepan, 2. Whisk, 3. Fine-mesh strainer, 4. Four 4-oz ramekins or glasses, 5. Small saucepan for compote, 6. Wooden spoon, 7. Measuring cups and spoons
Step-by-Step Instructions
Step 1: In your medium saucepan, gently warm the coconut milk and cashew cream over medium-low heat. This gradual heating prevents the coconut milk from separating and creates that silky base texture that makes panna cotta so luxurious.
Step 2: Scrape the vanilla bean seeds into the warm milk mixture, then add the empty pod for deeper flavor extraction. Whisk in maple syrup and sea salt, allowing the mixture to come to a gentle simmer while stirring consistently.
Step 3: Sprinkle agar powder evenly over the surface and whisk vigorously for 2-3 minutes. Unlike gelatin, agar requires thorough heating and whisking to activate properly, so don’t rush this crucial step.
Step 4: Remove vanilla bean pod and strain the mixture through your fine-mesh strainer to eliminate any agar lumps. This ensures the perfectly smooth texture that distinguishes restaurant-quality panna cotta.
Step 5: Divide mixture among ramekins and refrigerate for at least 4 hours. The agar will set at room temperature, but chilling develops the ideal creamy consistency.
Step 6: For compote, combine berries, maple syrup, and lemon juice in small saucepan over medium heat. Cook until berries release their juices, about 5 minutes.
Step 7: Stir in cornstarch slurry and cook for another 2 minutes until thickened. The compote should coat the back of your spoon but still flow easily.
Step 8: Let compote cool completely before spooning over chilled panna cotta just before serving.
Final Notes
• The key to perfect vegan panna cotta lies in properly activating the agar through consistent whisking and adequate heating, creating that signature wobble without any grittiness.
8. Gingerbread Trifle with Cashew Cream
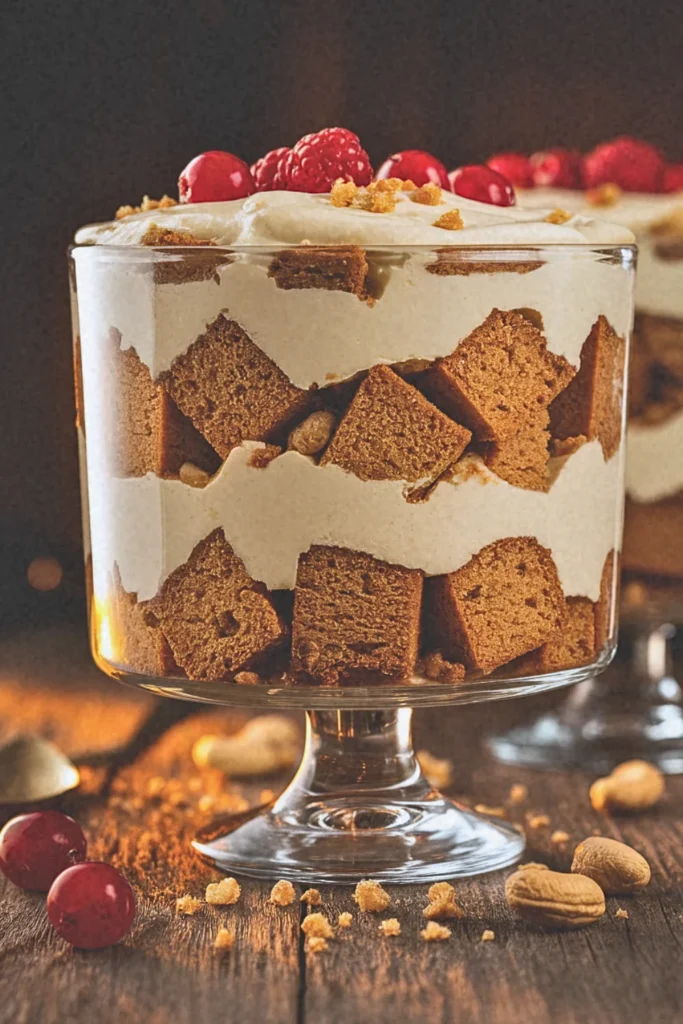
Layers of spiced cake, creamy filling, and caramelized pears create a show-stopping centerpiece. This dessert improves as flavors meld, making it perfect for advance preparation.
Recipe Highlights (Quick Glance Section)
✅ Prep Time: 25 min
✅ Cook Time: 30 min
✅ Total Time: 55 min (plus 2 hours chilling)
✅ Servings: 6
✅ Estimated Cost: $18
✅ Calories per Serving: 420
✅ Dietary Info: Vegan, Nut-Based, Refined Sugar-Free
Category
✅ Courses: Dessert
✅ Cuisines: British-American Holiday Fusion
Ingredients
For Gingerbread Cake:
- 2 cups all-purpose flour (substitute: gluten-free flour blend)
- 1 tsp baking soda
- 2 tsp ground ginger
- 1 tsp cinnamon
- 1/2 tsp nutmeg
- 1/4 tsp cloves
- 1/2 cup molasses
- 1/2 cup coconut oil, melted
- 3/4 cup plant milk (substitute: any non-dairy milk)
- 1/2 cup brown sugar
- 1 flax egg (1 tbsp ground flaxseed + 3 tbsp water)
For Cashew Cream:
- 2 cups raw cashews, soaked 4 hours
- 3/4 cup coconut cream
- 1/3 cup maple syrup
- 2 tsp vanilla extract
- Pinch of salt
For Assembly:
- 1/4 cup crystallized ginger, chopped
- Fresh berries for garnish
Equipment
- 9-inch square baking pan, 2. Large mixing bowl, 3. Whisk, 4. High-speed blender, 5. Fine-mesh strainer, 6. Glass trifle bowl or individual glasses, 7. Rubber spatula, 8. Measuring cups and spoons
Step-by-Step Instructions
Step 1: Preheat your oven to 350°F and prepare your flax egg by mixing ground flaxseed with water, allowing it to gel for 5 minutes. This creates the binding properties that eggs traditionally provide in baking, giving structure to your gingerbread.
Step 2: In your large mixing bowl, whisk together all dry ingredients thoroughly. This step ensures even spice distribution, which is crucial for achieving that classic gingerbread flavor profile throughout every bite.
Step 3: Create a well in the center of your dry ingredients and add molasses, melted coconut oil, plant milk, brown sugar, and prepared flax egg. Mix gently until just combined, being careful not to overmix, which can result in a tough texture.
Step 4: Pour batter into your prepared baking pan and bake for 25-30 minutes until a toothpick inserted in center comes out clean. The cake should spring back lightly when touched and will continue cooking from residual heat after removal.
Step 5: While cake bakes, drain and rinse your soaked cashews. The soaking process softens them considerably, allowing for the ultra-smooth cream texture that makes this trifle so luxurious when blended properly.
Step 6: In your high-speed blender, combine cashews, coconut cream, maple syrup, vanilla, and salt. Blend on high for 2-3 minutes until completely smooth and creamy. Strain if necessary to remove any remaining grittiness.
Step 7: Once cake has cooled completely, cut into cubes. This cooling step is essential because warm cake will melt your cashew cream and create an unappetizing muddy layer instead of distinct, beautiful strata.
Step 8: In your trifle bowl, create alternating layers starting with cake cubes, then cashew cream, and crystallized ginger. Repeat layers, ending with cream on top for the most visually appealing presentation.
Step 9: Refrigerate assembled trifle for at least 2 hours before serving to allow flavors to meld and cream to set properly.
Final Notes
• The key to exceptional cashew cream lies in soaking time and blending duration, creating a silky texture that rivals traditional dairy-based creams perfectly.
9. Pomegranate Poached Pears with Cinnamon
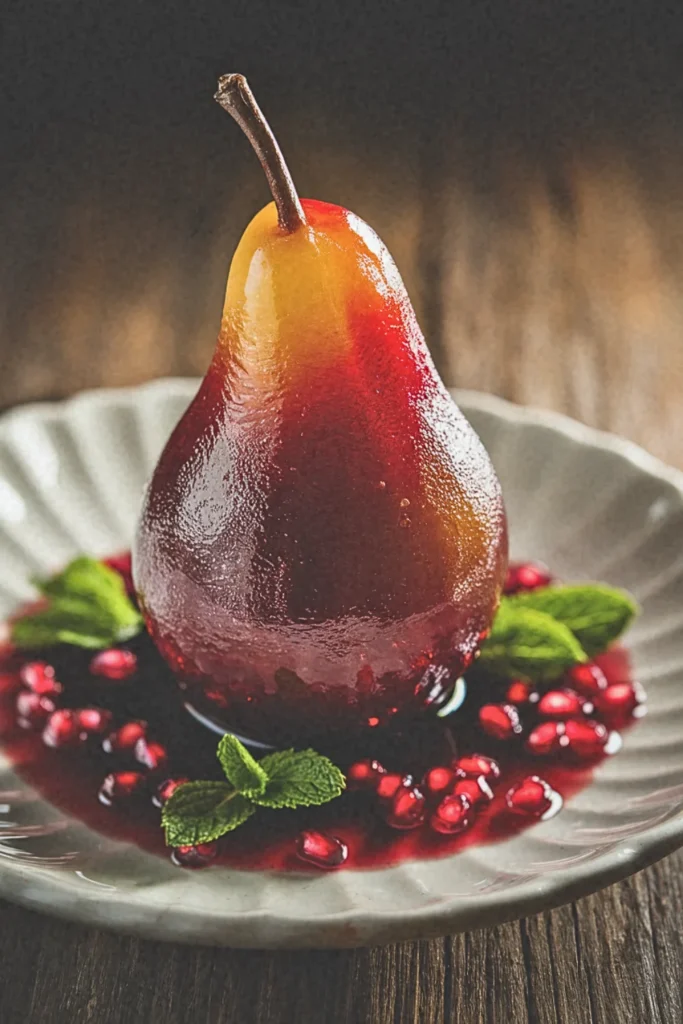
These elegant pears simmer in pomegranate juice and warming spices until tender and jewel-toned. The natural fruit sugars create their own syrup without added sweeteners.
Recipe Highlights (Quick Glance Section)
✅ Prep Time: 15 min
✅ Cook Time: 25 min
✅ Total Time: 40 min
✅ Servings: 4
✅ Estimated Cost: $14
✅ Calories per Serving: 165
✅ Dietary Info: Vegan, Gluten-Free, Low-Fat, Antioxidant-Rich
Category
✅ Courses: Dessert
✅ Cuisines: Mediterranean-French Fusion
Ingredients
For Poaching Liquid:
- 2 cups pure pomegranate juice (substitute: cranberry juice with 2 tbsp pomegranate molasses)
- 1 cup water
- 1/3 cup maple syrup (substitute: agave nectar)
- 2 cinnamon sticks
- 4 whole cloves
- 1 star anise pod
- 1 strip orange zest
- 1 tbsp lemon juice
For Pears:
- 4 firm Bosc or Anjou pears, peeled with stems intact
- 1/4 cup pomegranate seeds for garnish
- Fresh mint leaves for garnish
Equipment
- Large heavy-bottomed saucepan, 2. Sharp paring knife, 3. Vegetable peeler, 4. Wooden spoon, 5. Fine-mesh strainer, 6. Small saucepan for reduction, 7. Serving plates, 8. Ladle
Step-by-Step Instructions
Step 1: Begin by understanding that proper pear selection forms the foundation of this dish. Choose pears that yield slightly to gentle pressure near the stem but remain firm overall. This ensures they maintain structural integrity during the gentle poaching process while absorbing the complex pomegranate flavors.
Step 2: Carefully peel each pear while preserving the elegant stem, which serves both aesthetic and practical purposes. The stem acts as a natural handle during cooking and creates the classic poached pear silhouette that makes this dessert so visually striking when presented.
Step 3: Create your aromatic poaching liquid by combining pomegranate juice, water, maple syrup, and all spices in your heavy-bottomed saucepan. The pomegranate juice provides both color and tannins that will gradually penetrate the pear flesh, while the spices create layers of warming complexity that complement the fruit’s natural sweetness.
Step 4: Bring the poaching liquid to a gentle simmer over medium heat, allowing the spices to bloom and release their essential oils. This initial heating step is crucial because it activates the aromatic compounds that will infuse throughout the cooking process, creating depth beyond simple fruit and sugar combinations.
Step 5: Carefully nestle the peeled pears into the simmering liquid, ensuring they’re mostly submerged. The gentle bubbling action allows for even heat distribution while preventing the delicate fruit from breaking apart under aggressive boiling temperatures.
Step 6: Cover the saucepan and maintain a gentle simmer for 20-25 minutes, turning pears occasionally to ensure even coloring. The gradual cooking process allows the pomegranate’s natural sugars and acids to penetrate the pear tissue, creating that beautiful ruby-red exterior while maintaining the fruit’s tender yet firm texture.
Step 7: Test for doneness by inserting a knife tip into the thickest part of a pear. It should pierce easily while the pear retains its shape, indicating proper tenderness without mushiness that would compromise the final presentation.
Step 8: Remove pears carefully and strain the poaching liquid, discarding the whole spices. Transfer the liquid to your small saucepan and reduce over medium-high heat until it reaches a syrupy consistency that will coat the back of a spoon, concentrating all those beautiful flavors into an intense glaze.
Step 9: Present each pear standing upright on individual plates, drizzled with the reduced pomegranate syrup and garnished with fresh pomegranate seeds and mint leaves for color contrast and textural interest.
Final Notes
Understanding that poaching transforms fruit through gentle heat application and flavor infusion creates restaurant-quality desserts that celebrate natural ingredients with sophisticated technique and presentation.
10. Chocolate Hazelnut Torte with Aquafaba Meringue
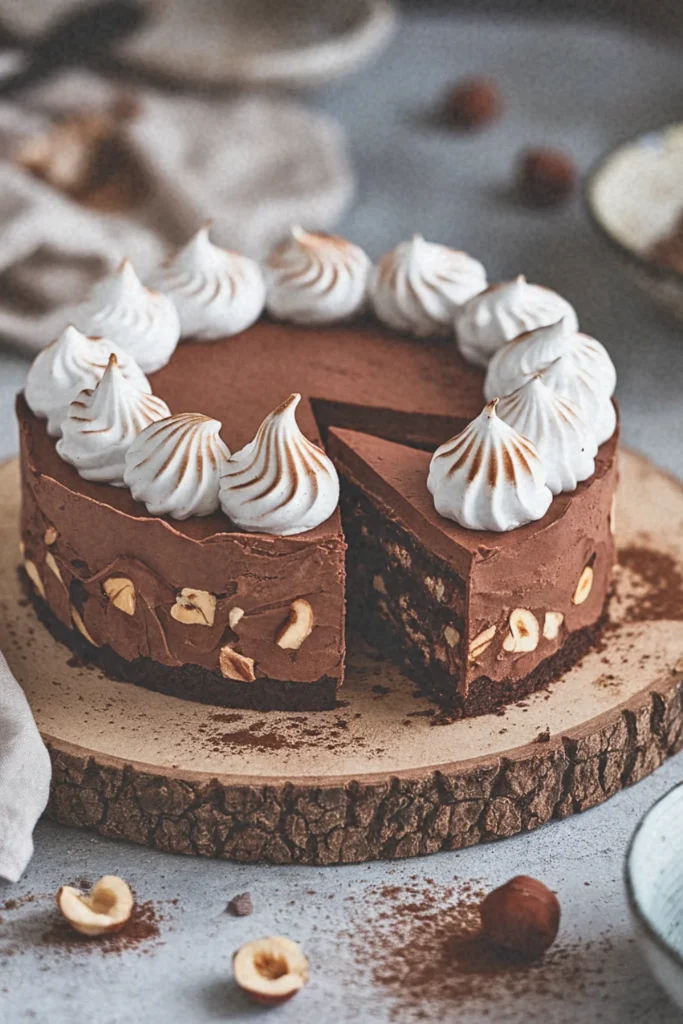
A flourless chocolate base topped with cloud-like meringue made from chickpea liquid. This dessert demonstrates how traditional techniques translate beautifully to plant-based ingredients.
Recipe Highlights (Quick Glance Section)
✅ Prep Time: 45 min
✅ Cook Time: 35 min
✅ Total Time: 80 min
✅ Servings: 8
✅ Estimated Cost: $18
✅ Calories per Serving: 385
✅ Dietary Info: Vegan, Dairy-Free, Egg-Free
Category
✅ Courses: Dessert
✅ Cuisines: European
Ingredients
For the Torte:
- 1½ cups all-purpose flour (substitute: gluten-free flour blend)
- ¾ cup cocoa powder
- 1 cup granulated sugar
- 1 tsp baking soda
- ½ tsp salt
- 1 cup non-dairy milk (oat or almond work best)
- ⅓ cup melted coconut oil
- 2 tbsp apple cider vinegar
- 1 tsp vanilla extract
- ½ cup roasted hazelnuts, chopped
For the Aquafaba Meringue:
- ½ cup aquafaba (liquid from canned chickpeas)
- ⅓ cup powdered sugar
- ¼ tsp cream of tartar
- 1 tsp vanilla extract
Equipment
- 9-inch springform pan, 2. Electric mixer or stand mixer, 3. Large mixing bowls, 4. Wire whisk, 5. Rubber spatula, 6. Measuring cups and spoons, 7. Fine mesh sieve
Step-by-Step Instructions
Step 1: Preheat your oven to 350°F and grease your springform pan. This temperature ensures even baking while preventing the delicate torte from burning.
Step 2: Sift together flour, cocoa powder, sugar, baking soda, and salt in a large bowl. Sifting creates a lighter texture by aerating the dry ingredients.
Step 3: Whisk together non-dairy milk, melted coconut oil, apple cider vinegar, and vanilla extract. The vinegar activates the baking soda, creating lift without eggs.
Step 4: Pour wet ingredients into dry ingredients, mixing until just combined. Fold in chopped hazelnuts gently to maintain the torte’s tender crumb.
Step 5: Pour batter into prepared pan and bake for 30-35 minutes until a toothpick inserted in center comes out with few moist crumbs.
Step 6: While torte cools completely, prepare meringue by whipping aquafaba with cream of tartar for 3-4 minutes until foamy peaks form.
Step 7: Gradually add powdered sugar and vanilla, continuing to whip for 8-10 minutes until stiff, glossy peaks develop. The aquafaba proteins create structure similar to egg whites.
Step 8: Spread meringue over cooled torte using decorative swirls, then torch lightly or broil briefly for golden peaks.
Final Notes
• The aquafaba must be from unsalted chickpeas and at room temperature to achieve proper meringue consistency that rivals traditional egg-based versions.
11. Chai Spiced Rice Pudding with Coconut Milk
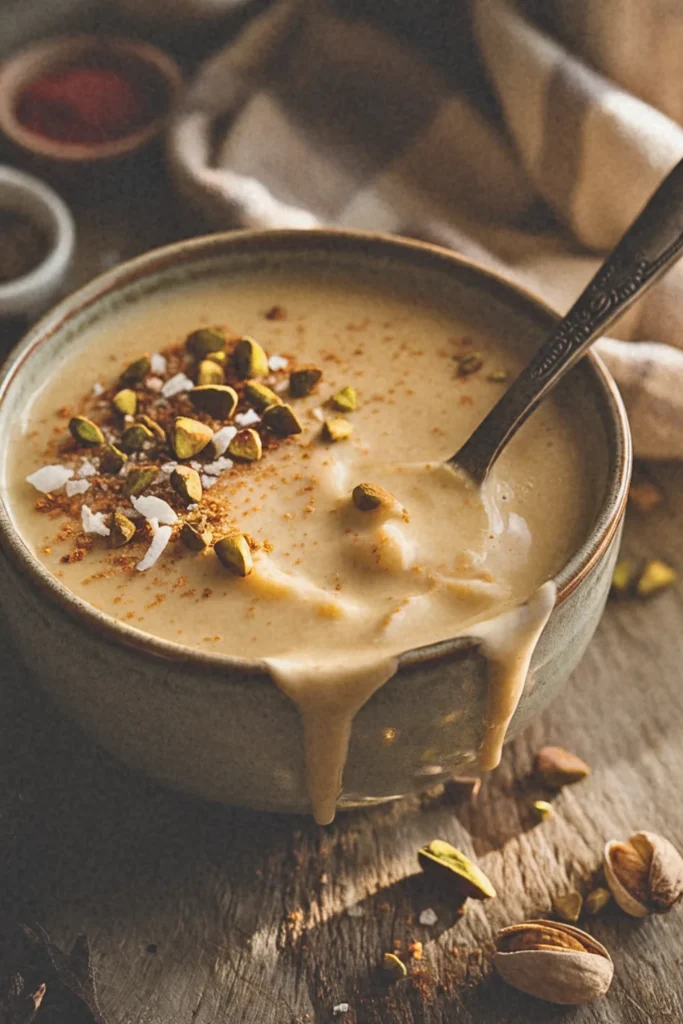
Creamy arborio rice slowly cooks in spiced coconut milk until luxuriously thick. Cardamom, cinnamon, and ginger create warming complexity while remaining naturally gluten-free and refined sugar-free.
Recipe Highlights (Quick Glance Section)
✅ Prep Time: 10 min
✅ Cook Time: 25 min
✅ Total Time: 35 min
✅ Servings: 4
✅ Estimated Cost: $8
✅ Calories per Serving: 295
✅ Dietary Info: Vegan, Gluten-Free, Refined Sugar-Free
Category
✅ Courses: Dessert, Breakfast
✅ Cuisines: Indian-Inspired, Asian Fusion
Ingredients
For the Base:
- 1 cup jasmine rice, rinsed (substitute: basmati or arborio rice)
- 1 can (14oz) full-fat coconut milk
- 2 cups unsweetened almond milk (substitute: oat or cashew milk)
- ⅓ cup maple syrup (substitute: agave nectar or coconut sugar)
- 1 tsp vanilla extract
For the Chai Spice Blend:
- 1 tsp ground cinnamon
- ½ tsp ground cardamom
- ¼ tsp ground ginger
- ⅛ tsp ground cloves
- ⅛ tsp ground nutmeg
- Pinch of black pepper
For Garnish:
- 2 tbsp chopped pistachios or almonds
- 1 tbsp coconut flakes (optional)
Equipment
- Heavy-bottomed saucepan, 2. Wooden spoon, 3. Fine mesh strainer, 4. Measuring cups and spoons, 5. Small mixing bowl, 6. Serving bowls, 7. Ladle
Step-by-Step Instructions
Step 1: Begin by rinsing your jasmine rice under cold water until the water runs clear. This crucial step removes excess starch that could make your pudding gluey rather than creamy. Think of this as preparing a clean canvas for your flavors.
Step 2: Combine all chai spices in a small bowl and whisk together thoroughly. Creating your own spice blend allows you to control the flavor intensity and ensures even distribution throughout the pudding.
Step 3: Pour coconut milk and almond milk into your heavy-bottomed saucepan. The thick base of this pan prevents hot spots that could cause scorching, which would create bitter flavors that compete with the delicate chai spices.
Step 4: Add the rinsed rice and chai spice mixture to the milk, stirring to combine completely. Bring the mixture to a gentle boil over medium heat while stirring frequently to prevent the bottom from sticking.
Step 5: Once boiling, reduce heat to low and simmer for 20-25 minutes, stirring every few minutes. The rice will gradually absorb the aromatic milk while releasing its natural starches to create that signature creamy texture.
Step 6: During the final five minutes of cooking, stir in maple syrup and vanilla extract. Adding sweeteners near the end prevents them from interfering with the rice’s natural cooking process.
Step 7: Remove from heat when the pudding coats the back of your wooden spoon and the rice grains are tender. The mixture will continue thickening as it cools due to the natural starches.
Step 8: Serve warm or chilled, garnished with chopped nuts and coconut flakes for textural contrast against the smooth, spiced pudding.
Final Notes
• The coconut milk’s natural fats create richness while the chai spices provide warming complexity that transforms simple rice into an elegant, aromatic dessert experience.
Must-Try: No Sugar Vegan Dessert Recipes.

Hi, I’m Aldvin Gomes, a passionate vegan and foodie on a mission to make plant-based eating effortless and exciting. I share new vegan recipes every day, so you never have to stress about what to cook. Whether you’re a longtime vegan or just exploring plant-based meals, my goal is to keep your plate full of delicious, wholesome, and easy-to-make dishes. I’m here to help you enjoy every bite. Join me in exploring the endless possibilities of vegan cooking, one delicious recipe at a time!